Author: robertsilk

  • Reading the Office UI Theme

    Reading the Office UI Theme

    In 2016, Microsoft officially introduced the ability to toggle between light and dark themes in Windows 10. With Office 2016, there was also the ability to switch to a black theme for Office applications, but it wasn’t until Windows 11 that the Office UI Theme had the option of “Use system setting” so that users who had set Windows to use a dark theme, would have a dark/black theme in their Office apps by default. Most recently Excel has also introduced an additional “Dark Mode” toggle button on the View ribbon, which sets the main worksheet to use a black background with white text.

    Many users like to use a dark theme / dark mode as it reduces the amount of bright white light from their screen, and it can give a more modern feel to the UI. However, there are also an equal number, if not more, that like the traditional look and feel of the colourful / light mode for Office applications. As a developer, it is nice to be able to accommodate both camps and preferably be able to dynamically tell which theme/mode the user is using and match your own project UI to that user’s preference.

    Sadly, when it comes Excel project development, and especially VBA-based development, this can be very difficult to accommodate. Microsoft has not updated the style of the UserForm elements in VBA in a long time, and so any VBA applications tend to look like a throwback to Windows 97. Some more customisation is possible when developing VBA tools for Office through Visual Studio, but this is used for compiled office add-ins rather than included VBA code within a single Excel project file.

    Part of the problem is that Microsoft is pushing towards Office Scripts tools and automation where a HTML-based UI is used, but at present there are still plenty of disadvantages for many Excel projects in using Office Scripts over VBA.

    There is, and it can look great! But that is a subject for another day (future post incoming).

    Instead, in this post I plan to go over how it is possible to read which Office theme a user is currently using and then update the styling of a standard VBA UserForm as it is loaded so that you can match your UI to the user’s main Excel application.

    Reading the UI Theme

    Both the chosen Windows theme and the Office UI theme are stored as persistent values in the registry. Values in the registry are stored as key-value pairs similar to entries in a Dictionary object.

    In order to read the value for a registry key you simply need to know the full address for that registry key. Similarly, setting a registry key requires the full address, however, often also requires additional permissions, such as admin permissions, and so can be an issue when sharing with others who may not have the necessary permissions for setting/creating registry keys.

    To find the required registry address, you can either employ some expert Google skills and find an article which describes it, or you can take a more DIY approach:

    • use a program like Process Monitor (Procmon.exe), which monitors all process calls made by Windows; filter the monitoring output for registry calls and for the Excel application (e.g. excel.exe), and then look to see what is updated as you toggle the UI Theme option in Excel.

    For Windows 11 (I haven’t been able to test this on Windows 10 at the moment) and Office 365:

    • the Windows theme is stored in the registry with the key AppsUseLightTheme at the following address:
      • HKEY_CURRENT_USER\Software\Microsoft\Windows\CurrentVersion\Themes\Personalize\AppsUseLightTheme
      • 0 = No/False -> Dark theme
      • 1 = Yes/True -> Light theme
    • the Office UI theme setting is stored in the registry with the key UI Theme at the following full address:
      • HKEY_CURRENT_USER\Software\Microsoft\Office\16.0\Common\UI Theme
      • 3 = Dark Grey
      • 4 = Black
      • 5 = White
      • 6 = Use system setting (i.e. Windows theme setting)
      • 7 = Colourful

    In order to match your project UI to the user chosen Office UI theme, read the Office UI theme value first; if it comes back as a value of 6 (“Use system setting”), then read the Windows theme value:

    • for Windows Light mode use the Office White theme (5)
    • for Windows Dark mode use the Office Black theme (4)

    To read a registry entry, first create a Windows Script Host object (WScript) in order to run shell methods (line 5) using CreateObject(). To read a registry value, use the .RegRead() method (line 9). It is important to set the created object back to Nothing after you have finished using it in order to release the object from memory (line 13).

    ' Define local variables
    Dim objShell As Object
    
    ' Create the Windows Scipt Host object
    Set objShell = CreateObject("WScript.Shell")
    
    On Error Resume Next
        ' Attempt to read the local user Office UI Theme Regisrty entry
        Debug.Print "OfficeUI Theme: " & objShell.RegRead("HKEY_CURRENT_USER\Software\Microsoft\Office\16.0\Common\UI Theme")
        ' Attempt to read the local user Windows Theme Registry entry
        Debug.Print "Windows Theme:  " & objShell.RegRead("HKEY_CURRENT_USER\Software\Microsoft\Windows\CurrentVersion\Themes\Personalize\AppsUseLightTheme")
    On Error Goto 0
    
    ' Clear object as no longer needed
    Set objShell = Nothing
    

    Using the Office UI Theme

    By reading the current Office (+/- Windows theme if the Office theme comes back as “Use system setting”), you can adjust the look of your UserForm to give a more cohesive appearance when the user transitions from native Excel UI to your projects UI.

    To update the styling of a UserForm before it becomes visible to the user, you would need to check the current Office UI theme as part of the UserForm_Initialize() sub routine. This sub routine is executed when another process first calls the UserForm and completes before the UserForm_Activate() sub routine which is executed at the point at which the UserForm is to be displayed to the user and becomes available for the user to interact with.

    A relatively efficient method of doing this is, having got the current UI theme, to update a series of module-level variables which define UI element colours to match the theme. These colour variables then are used to update the different UserForm elements as required before the UserForm is displayed either also in the Initialize() sub routine or in the Activate() sub routine.

    Below is a simple example of reading the Office UI theme using an approach similar to that shown in the code above and then updating a simplied UserForm to match the Excel theme styling.

    ' Defining the global variables used to set the form element colours
    Dim lnFgPrimary As Long, lnFgSecondary As Long
    Dim lnBgPrimary As Long, lnBgSecondary As Long
    Dim lnClrAccent1 As Long, lnClrAccent2 As Long, lnClrFooter As Long
    
    Private Sub UserForm_Initialize()
        
        ' Define local variables
        Dim intTheme As Integer
        
        ' Attempt to read the current Office UI Theme value and set the appropriate colour variables
        intTheme = GetThemeInfo
        Call SetThemeColours(intTheme)
        
        ' Update the form elements as required
        Me.BackColor = lnBgPrimary
        Me.ForeColor = lnFgPrimary
        Me.Lbl_Title.ForeColor = lnClrAccent1
        Me.Img_Divider.BackColor = lnClrAccent2
        With Me.Frm_Main
            .BackColor = lnBgSecondary
            .ForeColor = lnFgSecondary
        End With
        Me.Lbl_Main.ForeColor = lnFgSecondary
        Me.Lbl_Footer.BackColor = lnClrFooter
        
    End Sub
    
    Private Function GetThemeInfo() As Integer
        
        '### Return values:
        '###    1 = Colourful (light) theme
        '###    2 = Black (Dark) theme
        '###    3 = Dark grey theme
        '###    4 = White theme
        '### Defaults to the Colourful/Light theme
        
        ' Define local variables
        Dim intTh As Integer, intWn As Integer, intReturn As Integer
        
        ' Read the Office UI Theme and Windows UI Theme using the RXL_OfficeUtilities functions
        intTh = RXL_OfficeUtilities.ReadOfficeUITheme_Value
        ' If the Office theme value is 6 ("Use system setting") then also read the Windows theme
        If intTh = 6 Then _
            intWn = RXL_OfficeUtilities.ReadWindowsUITheme_Value
        
        ' Decide the correct return value based on the Office UI theme and Windows theme values
        Select Case intTh
            Case 7
                intReturn = 1
            Case 4
                intReturn = 2
            Case 3
                intReturn = 3
            Case 5
                intReturn = 4
            Case 6
                If intWn = 0 Then
                    intReturn = 2
                Else
                    intReturn = 4
                End If
            Case Else
                intReturn = 1
        End Select
        
        ' Return function result
        GetThemeInfo = intReturn
        
    End Function
    
    Private Sub SetThemeColours(ByVal pInt As Integer)
        
        ' Set the module-level colour variables based on the theme value passed as pInt
        Select Case pInt
            Case 1
                lnFgPrimary = 0             'RGB(0,0,0)
                lnFgSecondary = 2697513     'RGB(41,41,41)
                lnBgPrimary = 16777215      'RGB(240,240,240)
                lnBgSecondary = 16777215    'RGB(255,255,255)
                lnClrAccent1 = 16777215     'RGB(255,255,255)
                lnClrAccent2 = 12106326     'RGB(86,186,184)
                lnClrFooter = 15790320      'RGB(240,240,240)
            Case 2
                lnFgPrimary = 16777215      'RGB(255,255,255)
                lnFgSecondary = 16777215    'RGB(255,255,255)
                lnBgPrimary = 0             'RGB(0,0,0)
                lnBgSecondary = 2697513     'RGB(41,41,41)
                lnClrAccent1 = 14145696     'RGB(160,216,215)
                lnClrAccent2 = 12106326     'RGB(86,186,184)
                lnClrFooter = 2697513       'RGB(41,41,41)
            Case 3
                lnFgPrimary = 0             'RGB(0,0,0)
                lnFgSecondary = 0           'RGB(0,0,0)
                lnBgPrimary = 5395026       'RGB(82,82,82)
                lnBgSecondary = 12434877    'RGB(189,189,189)
                lnClrAccent1 = 16777215     'RGB(255,255,255)
                lnClrAccent2 = 12106326     'RGB(86,186,184)
                lnClrFooter = 12434877      'RGB(189,189,189)
            Case 4
                lnFgPrimary = 0             'RGB(0,0,0)
                lnFgSecondary = 2697513     'RGB(41,41,41)
                lnBgPrimary = 16777215      'RGB(240,240,240)
                lnBgSecondary = 16777215    'RGB(255,255,255)
                lnClrAccent1 = 8620825      'RGB(25,139,131)
                lnClrAccent2 = 12106326     'RGB(86,186,184)
                lnClrFooter = 15790320      'RGB(240,240,240)
        End Select
        
    End Sub


    The UserForm_Initialize() sub routine starts by calling the GetThemeInfo() function to determine the current user Office UI theme (line 12). The GetThemeInfo() function returns a numeric value for the current theme, defaulting to 1 for the colourful/light theme as this tends to be most widely used Office UI theme. The returned theme value is then used in the SetThemeColours() sub routine call (line 13).

    The SetThemeColours() sub routine uses a Select statement to set the appropriate colour values for the module-level variables (lines 75-108) based on the passed theme value (pInt). When setting a colour, most UserForm elements/controls require a Long data type value (a whole number) rather than a colour code such as RGB. As such it is easier to store the chosen colour values in the code as the calculated Long value with the RGB colour code shown next to the Long value as a comment for reference.

    Having determined the current theme choice and set the colour variables, the UserForm_Initialize() sub routine is then used to update the required UserForm elements/controls using the updated module-level colour variables (lines 16-25) before the UserForm_ Activate() sub routine is executed and the UserForm is displayed to the user.

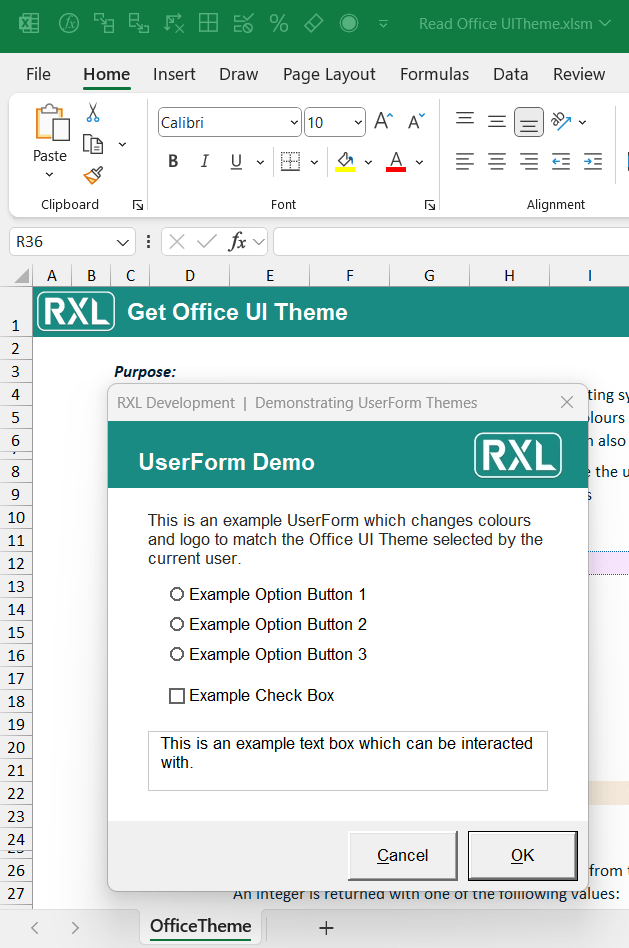
    Below are screen shots of the simple UserForm in the above VBA code across the four different Office UI themes.

    If you wish to have a play around with this idea more yourself and investigate the code, I have uploaded an demo file. The file contains the full RXL_OfficeUtilities VBA module and a simple example UserForm which updates to the Office UI theme as shown in the screen shots above. The file (Read Office UI Theme.xlsm) can be found in the RXL_VBATools GitHub repository at the following address:

    https://github.com/r-silk/RXL_VBATools/tree/main/OfficeUITheme

    The RXL_OfficeUtilities VBA module contains different functions for reading the UI theme, as well as functions to read the full Excel version and build number.

    • ReadOfficeUITheme_Value()
      • Reads the Office UI theme and returns a numeric value to indicate which theme is currently in use
    • ReadWindowsUITheme_Value()
      • Reads the Windows UI theme and returns a numeric value to indicate which theme is currently in use
    • ReadOfficeUITheme_String( )
      • Reads the Office UI theme and Windows UI theme and returns a string with the name of the theme currently in use
    • ReadExcelBuildNumber_String( )
      • Reads the full Excel version and build number for the current Excel instance and returns a string in the format: [major].[minor].[revision].[build]
    • ReadExcelBuildNumber_Array( )
      • Reads the full Excel version and build number for the current Excel instance, splits it into parts, and returns an array in the format:
        • (1) = major version number
        • (2) = minor version number
        • (3) = revision number
        • (4) = build number

    If you would like to have a closer look at the RXL_OfficeUtilities code and have a play around with a demo, there is an Excel file (Read Office UI Theme.xlsm) which can be downloaded from the RXL_VBATools GitHub repository within the OfficeUITheme sub-folder:

    https://github.com/r-silk/RXL_VBATools

    To include the RXL_OfficeUtilities module in your own Excel project, you simply need to import the module into your VBA project and then make the requried function call as discussed above.

    The module can be imported by using one of the two methods below:

    1. Copy from demo file
      • If you have downloaded the Read Office UI Theme.xlsm file (https://github.com/r-silk/RXL_VBATools), you can copy the module and import it directly.
      • Open the Read Office UI Theme.xlsm file, as well as the Excel file you wish to import it into, and open the VB Editor.
      • Find the RXL_OfficeUtilities module in the VB Editor Project Explorer, right-click on the module and select “Export File…
      • Save the RXL_OfficeUtilities.bas file to your Desktop.
      • Select the Excel file you wish to import the module to in the VB Editor Project Explorer, right-click, and select “Import File…
      • You can then select the RXL_OfficeUtilities.bas file from your Desktop and click “Open” – this will import a copy of the VBA module into your Excel project file.
    2. Download from repository
      • Alternatively, go to the GitHub repository and the OfficeUITheme sub-folder, where the demo file is saved (https://github.com/r-silk/RXL_VBATools), and directly download the RXL_OfficeUtilities.bas file.
      • Open the Excel file you wish to import the module into, go to to the VB Editor and find the chosen Excel file in the VB Editor Project Explorer.
      • Right-click on the chosen Excel file and select “Import File…“; choose the RXL_OfficeUtilities.bas file where you downloaded it to and click “Open” – this will import a copy of the VBA module into your Excel project file.

  • Excel Status Bar Progress Bar

    Excel Status Bar Progress Bar

    When developing Excel projects, sometimes it becomes necessary to provide some automation for your user, such as clicking a button to import some external data, update a complicated static output, or solve a circularity. In most cases this can be achieved by writing some VBA to run the process for your user and hopefully this will be a quick and simple process.

    However, despite the developers best efforts, the VBA code can run slowly (especially if the end user’s computer is not the most powerful or up-to-date) leaving your user staring at a spinning cursor wheel with no idea of what is happening, how much longer the code will take to finish, or if the code is even still running correctly. In cases where a process is expected to take more than 1-2 seconds to complete, some form of progress bar or progress message can help the user to understand what is happening and how far along the process has got to.

    Potential options to alert the users to what is happening as the VBA code executes include:

    • Displaying a pop-up window (via a UserForm) displaying a message to the user; the message can be updated as the code progresses to keep the user informed.
    • Displaying a pop-up window (via a UserForm) displaying an animated progress bar to visual for the user how far along the total VBA code execution the process has got; this can include a text message as well.

    The main disadvantage of this approach is that it requires additional processing power to load and display the pop-up window (UserForm), and each time your code wants to update the progress bar or the displayed message, the UserForm needs to re-paint the window, which will interrupt the VBA code running and take up some processing power and execution time. I have also noticed that using this approach can lead to a lot of screen flickering, particularly when the code does run faster or frequent updates to the displayed pop-up window are processed. Although this screen flickering will successfully indicate to the user that something is happening and the code is progressing, it can be quite distracting and off-putting to watch.

    The Idea

    You may have noticed that often Excel makes use of the Excel Status Bar (at the bottom of the Excel window) to display messages and even progress bars, such as when saving a workbook. The Status Bar can be easily updated without the process executing in VBA itself (as an update to the displayed Status Bar text triggers processes within the Excel application itself) and as it is not a separate window there is little to no screen flicker with fast/frequent updates.

    I had previously seen a 3rd party Excel add-in which made use of the Excel Status Bar to display a simple text-based progress bar and a percentage value to represent how far along a VBA process the code had got to. This add-in used a series of “-” characters to show the length of the unfilled progress bar and replaced the “-” characters with a “|” or “/” character as the progress bar was filled. This achieved what I wanted to replicate, but as you cannot control the font used in the Status Bar (e.g. setting a mono-space font), when the displayed progress bar text changes from “-” characters to “|” characters the length of the displayed progress bar changes, which is quite distracting and doesn’t look as smooth as I wanted.

    After a lot of Googling, I found a suggestion to look at the extended Unicode character set which can be used to display a series of set characters beyond the standard Latin characters in most default fonts. The Unicode character set includes box drawing characters, which were used in the first text-based computer games in MS-DOS, as well block elements, geometric shapes and other widely used symbols.

    Within the geometric shapes set I found the filled “black square” (Unicode U+25A0) and empty “white square” (Unicode U+25A1). Unfortunately, when displayed in the Excel Status Bar, the white square character is smaller than the filled square meaning that as the progress bar fills and the filled squares replace the empty squares, the progress bar changes length, which was what I was trying to avoid. Fortunately, after some trial an error, I found that the “empty ballot box” (Unicode U+2610) in the miscellaneous symbols section, displays in the Status Bar as the same size as the filled “black square” character.

    The idea was, to create a VBA module that would produce a nice looking text-based progress bar displayed in the Excel Status Bar, complete with percentage completion and optional message string. I wanted to make this a self-contained module which could simply be dropped in to any VBA project and easily used and updated with a couple of sub-routine calls and minimal impact on the execution of the main code which was calling it.

    VBA Status Bar Progress Bar

    Below is the main code for my version of an Excel Status Bar progress bar. It uses three sub-routines and four module-level constants to control its functionality.

    0. Module-Level Constants & Variables

    ' Constants
    Private Const ProgBar_Len As Integer = 20   ' Sets the total size of the progress bar in "blocks"
    Private Const ProgBar_Max As Integer = 255  ' The max Excel StatusBar string in characters
    Private Const Char_Empty As Long = 9744     ' Unicode character Hex: &H2610 => CLng("&H2610") = 9744
    Private Const Char_Full As Long = 9632      ' Unicode character Hex: &H25A0 => CLng("&H25A0") = 9632
    
    ' Variables used for the Progress Bar
    Dim ProgBar_Empty As String * 1, ProgBar_Full As String * 1
    Dim ProgBar_Set As Long
    Dim blUserStBar As Boolean
    

    The constants (declared with the key word Const) are Private as they are only intended to be used within the RXL_ProgressBar module. They are used to avoid having hard-coded values within the main code, and so that if one of the values needs to be updated, it can easily be done by updating the single constant value rather than having to find all occurrences of that hard-coded value in the code.

    The ProgBar_Len value sets how many text squares make up the length of the progress bar the code creates. By default, it is set to 20 blocks so that each filled block/square represents 5%. completion. This can be updated if you wish.

    The ProgBar_Max value represents the maximum number of characters that the Excel StatusBar can hold and should not be changed.

    The Char_Empty and Char_Full values are the Long value representation of the Unicode characters for the progress bar characters. You can change these if you wish, but the value needs to be a whole number value (as a Long data type). As the Unicode character set uses hexadecimal values (represented as “U+” then the hex value), you can use the CLng() function in VBA to convert the hexadecimal portion of the U+ value into the corresponding numeric value.

    1. InitialiseProgressBar()

    Public Sub InitialiseProgressBar(Optional ByRef pStrMessage As String = "")
        
        ' Initialise the persistent global variables and set as required
        '  - where the VBA session has initialised or reset the global variables will be empty
        '    and re-defined, the variables will have been re-defined and initialised at 0 (zero)
        '  - by placing the string definitions in the global variables and only setting once at
        '    initialisation reduces the number nof ChrW() function calls
        ProgBar_Empty = ChrW$(Char_Empty)
        ProgBar_Full = ChrW$(Char_Full)
        
        ' Check the length of the max set portion of the progress bar string
        '  - uses the number of blocks to display plus the length of the max size of extra string
        '    which is made up of the progress % in brackets plus space to add the optional message
        ProgBar_Set = ProgBar_Len + Len(" (100%):  ")
        
        ' Capture the currnet user status for displaying the StatusBar
        blUserStBar = Application.DisplayStatusBar
        
        ' Ensure that the StatusBar is being displayed
        If Application.DisplayStatusBar = False Then _
            Application.DisplayStatusBar = True
        
        ' Set the initial output message and empty progress bar
        Call UpdateProgressBar(0, pStrMessage)
        
    End Sub
    

    The InitialiseProgressBar() sub routine should be called when before the progress bar is used for the first time. The sub routine sets the persistent progress bar characters (ProgBar_Empty and ProgBar_Full) as well calculating the total potential length of the progress bar with the percentage value text displayed (ProgBar_Set).

    The ProgBar_Empty and ProgBar_Full variables are declared as single character strings to optimise their memory allocation, and a single ChrW() function call is made to set each character for these global variables. As the ChrW() and Chr() function calls can be surprisingly expensive function calls, this process reduces the number of calls to just two at initialisation rather than at least two ChrW() function calls every time the progress bar is updated.

    The initialisation function captures the current user chosen Application.DisplayStatusBar state (determines whether Excel displays the Status Bar) and then ensures that it is displayed. Before, finally displaying the initial empty progress bar with 0% completion and with the optional message if provided via the pStrMessage argument.

    2. UpdateProgressBar()

    Public Sub UpdateProgressBar(ByVal pDblProgress As Double, _
                                 Optional ByRef pStrMessage As String = "")
        
        ' Define local variables
        Dim strOut As String
        Dim lnBlocks As Long, lnPercent As Long
        
        ' Restrict the progress value in case progress value passed is outside of the expected range
        If pDblProgress > 1 Then _
            pDblProgress = 1
        If pDblProgress < 0 Then _
            pDblProgress = 0
        ' Convert the passed progress value (% as Double/decimal) to a whole number
        lnPercent = CLng(pDblProgress * 100)
            
        ' Calculate the number of filled progress bar blocks for the passed progress value (%)
        lnBlocks = CLng(pDblProgress * ProgBar_Len)
        ' Restrict the number of bar blocks in case it is calculated as greater than the set total 
        ' progress bar length
        If lnBlocks > ProgBar_Len Then _
            lnBlocks = ProgBar_Len
        
        ' Note - max length for a StatusBar message is 255 characters
        '      - the progress bar aspect of the message will be between 28 and 30 characters
        '        [=> 20 boxes + "_(" + 1-3 digits for percentage complete + "%):__"]
        '      - need to check the length of the passed message string [:= pStrMessage] and restrict
        '         -> i.e. If greater than (255 - 30) then restrict to allowable length - 3, and add 
        '                 "..." at the end to indicate a truncated message string
        If Len(pStrMessage) > (ProgBar_Max - ProgBar_Set) Then
            pStrMessage = Left$(pStrMessage, ProgBar_Max - ProgBar_Set - 3) & "..."
        End If
        
        ' Construct the output string
        strOut = String(lnBlocks, ProgBar_Full) & _
                 String(ProgBar_Len - lnBlocks, ProgBar_Empty) & _
                 " (" & lnPercent & "%)"
        If pStrMessage <> vbNullString Then _
            strOut = strOut & ":  " & pStrMessage
            
        ' Display the constructed output string in the Excel StatusBar
        Application.StatusBar = strOut
        
    End Sub
    

    The UpdateProgressBar() sub routine is the main code in this module, which re-draws the progress bar each time it needs to be updated.

    The sub routine expects the pDblProgress argument to be passed as a decimal number between 0.00 and 1.00, which is equivalent to a percentage progress between 0% and 100%.

    • if a value is passed which is less than 0, then the sub routine will restrict the value to 0.00;
    • if a value is passed which is greater than 1, then the sub routine will restrict the value to 1.00.

    Although the value passed as the pDblProgress argument can have any number of decimal places, when calculating the number of filled progress bar characters to display and the conversion to a percentage figure to display, the value will be rounded down to the nearest whole number. This rounding in both cases is achieved by converting the calculated value (as a decimal value) to a Long data type, which is a non-decimal value. This conversion removes any decimal element to the number and just keeps the whole number portion of the value thereby effectively rounding down to the nearest whole number in an efficient manner.

    Both the pDblProgress argument and the optional pStrMessage argument can be calculated in the sub routine call. For example:

    • if a VBA process is being run which is made up of a fixed number of definable steps (totalSteps),
    • and the variable currStep represents the process step which is being executed
    • the UpdateProgressBar() sub routine could be run with the following code each time a new step starts execution
    UpdateProgressBar pDblProgress:=currStep/totalSteps, _
                      pStrMessage:="Running step " & currStep & " of " & totalSteps
    

    The pStrMessage parameter is optional and can have a text string of any length passed, which is then displayed to the right of the progress bar to inform the user of what the associated VBA code is doing at that time. If it is omitted, then the just the progress bar characters and the percentage progress are displayed.

    The Excel Status Bar has a maximum capacity of 255 characters (as reflected in the ProgBar_Max constant) and will cut off any characters beyond this total. To help deal with this, the code above will calculate the expected total constructed string length (the progress bar characters, % progress characters, and the optional message), and if this will be greater than 255 characters, the optional message string is restricted to the allowable length and “…” characters are added to the end to indicate that the string has been truncated.

    3. CloseProgressBar()

    Public Sub CloseProgressBar()
        
        ' Reset the StatusBar display to the setting used before initialising and displaying the 
        ' progress bar
        ' - checks if one of the calculated global variables is 0 (zero) which would indicate that 
        '   the global variables have cleared and reset and so the blUserStBar variable is likely a 
        '   false negative
        ' - where the calculated global variables are reset, default the DisplayStatusBar setting to True
        Application.DisplayStatusBar = IIf(ProgBar_Set = 0, True, blUserStBar)
        
        ' Release the StatusBar back to the application otherwise the final progress bar message 
        ' will persist
        Application.StatusBar = False
    
    End Sub
    

    The CloseProgressBar() sub routine attempts to reset the Application.DisplayStatusBar property to state that it was before the progress bar was initialised.

    The sub routine also makes an update call to the Application.StatusBar property, but instead of providing a string to update the Status Bar with, it sends a False value. This releases the Status Bar back to Excel so that further updates of the text displayed on the Status Bar comes from the Excel application itself. If this final False value is not sent, then your final progress bar and message will persist on the Status Bar beyond the end of your VBA code execution finishing.

    Example

    An example of the intended use of the three sub routines in the RXL_ProgressBar module is shown below:

    Private Sub Executed_VBA_Code()
        
        ' Start of the main process code
        ...
        
        ' Initialise the StatusBar progress bar with a start message
        InitialiseProgressBar pStrMessage:="Running [process] ..."
        
        ' More main process code
        ...
        
        ' Update the progress bar as each step of the main process is executed
        UpdateProgressBar pDblProgress:=(currStep - 1)/totalSteps, _
                          pStrMessage:="Running [process] - step " & currStep & " of " & totalSteps
        ...
        
        ' Update the progress bar for a final message
        UpdateProgressBar pDblProgress:=1, _
                          pStrMessage:="[process] finished!"
        ' Provide a message box for the user to indicate the main process has finished
        []
        ' Close the progress bar before ending the main process sub routine
        CloseProgressBar
        ' Complete any tidy-up code for the end of the main process code
        ...
        
    End Sub
    

    If you would like to have a closer look at the Status Bar Progress Bar code and have a play around with a demo, there is an Excel file (RXL_ProgressBar Demo.xlsm) which can be downloaded from the RXL_VBATools GitHub repository within the ProgressBar sub-folder:

    https://github.com/r-silk/RXL_VBATools

    To include the RXL_ProgressBar module in your own Excel project, you simply need to import the module into your VBA project and then make the three sub routine calls as discussed above.

    The module can be imported by using one of the two methods below:

    1. Copy from demo file
      • If you have downloaded the RXL_ProgressBar Demo.xlsm file (https://github.com/r-silk/RXL_VBATools), you can copy the module and import it directly.
      • Open the RXL_ProgressBar Demo.xlsm file, as well as the Excel file you wish to import it into, and open the VB Editor.
      • Find the RXL_ProgressBar module in the VB Editor Project Explorer, right-click on the module and select “Export File…
      • Save the RXL_ProgressBar.bas file to your Desktop.
      • Select the Excel file you wish to import the module to in the VB Editor Project Explorer, right-click, and select “Import File…
      • You can then select the RXL_ProgressBar.bas file from your Desktop and click “Open” – this will import a copy of the VBA module into your Excel project file.
    2. Download from repository
      • Alternatively, go to the GitHub repository and the ProgressBar sub-folder, where the demo file is saved (https://github.com/r-silk/RXL_VBATools), and directly download the RXL_ProgressBar.bas file.
      • Open the Excel file you wish to import the module into, go to to the VB Editor and find the chosen Excel file in the VB Editor Project Explorer.
      • Right-click on the chosen Excel file and select “Import File…“; choose the RXL_ProgressBar.bas file where you downloaded it to and click “Open” – this will import a copy of the VBA module into your Excel project file.

  • Workbook Information Functions (Part 2)

    Workbook Information Functions (Part 2)

    In my last post (Workbook Information Functions (Part 1)) I described three custom LAMBDA() functions which could be used to dynamically get useful information about a referenced Excel file, such as:

    • Worksheet name;
    • Workbook name and file type extension; and
    • file path.

    These three functions are relatively simple, work in very similar ways, and are complimentary. As such, they are a great candidate to demonstrate how a module of LAMBDA() functions can be created and maintained using the Excel Labs Advanced Formula Environment.

    Excel Labs Advanced Formula Environment

    Excel Labs is a free Excel add-in created by the Microsoft Garage Projects team. It can be downloaded from Microsoft AppSource and once installed can be accessed via a new “Excel Labs” button on the Excel Home ribbon.

    The Excel Labs add-in has three elements to it:

    My preference is to set the AFE as the default feature for Excel Labs so this is what opens automatically when I open Excel Labs. The Python Editor is excellent, but since Excel added a Python editor to standard Excel it is no longer really needed. Similarly, the LABS.GENERATIVEAI() function is fun to play around with, but I rarely ever use it and the page that opens from the Excel Labs add-in is only a setup and settings window so is not needed that often.

    The AFE window provides three tabs within the top green ribbon:

    • Grid
      • Provides a formula editor for the cell that is currently selected.
      • The formula editor is more like a traditional code IDE with auto-completion, syntax suggestions, syntax highlighting, error highlighting, and code commenting.
      • There is also a formula debugger for your standard Excel formulae which shows you the steps in the formula being edited in execution order and the result at each stage.
    • Names
      • Provides a manager and editor for defined names.
      • The defined names are split by type/category into Functions, Ranges, Formulas, and Modules.
    • Modules
      • Provides an IDE and editor for each module of defined names/functions.
      • In this format, each module is shown as a single text file with the defined function that make up the module included in the same text file in a set format.
      • By using a module, users can import multiple functions together as a single block of text or from a single Gist URL.

    LAMBDA() Modules

    In the Excel Labs AFE, modules are presented as a single block of text, similar to a single text file in Notepad, which can use line breaks and tab characters to format the text. Each function defined and stored within the module follows the format of:

    Function_Name = LAMBDA(
      ...
    );
    

    You can choose to either add individual functions to the general Workbook module, in which case they will use the name that they are declared with (e.g. =Function_Name() ), or you can add them to a defined module, in which case the function is used with module name and the function name, e.g. =Module.Function_Name().

    The AFE allows for the use of code commenting which can help in documenting and explaining any custom functions you create. The comments can be made as individual new lines with the “//” characters, they can be added to the end of a line of code again using the “//” characters, or you can create a multi-line block of comments using the “/*” characters at the start of the block and ending with “*/“.

    As can be seen in the image above as well as allowing for code comments the AFE editor will colour different syntax elements of a formula code to help distinguish them when reading and editing a formula. The editor also provides auto-completion suggestions as you type and will highlight any formula errors with red underlining to help in debugging your code as you type.

    When the AFE is used in this way to create or edit a custom function, the contents of the AFE formula editor window are saved within the Excel file that you are using in its fully formatted version including any new lines, indentation, and code comments. When you then save the edited function (using the save button in the Excel Labs ribbon), a further copy of the code for each function is created, where all code comments are removed along with superfluous formatting characters, and this copy is saved as a standard Excel Defined Name. It is the Defined Name version which is then used by the Excel file when the user uses a custom function in a worksheet formula as the code comments are not allowed in a valid defined function.

    As such, it is important that if you are using the AFE to create custom functions that any editing of these functions is performed in the AFE editor window rather than directly in the Excel Name Manager otherwise the version of the function code seen in the AFE may not match that seen in the Name Manager and any changes made to a function in the Name Manager will be over-written by the AFE the next time the module/function is saved.

    A major advantage of using Excel Labs for custom functions is how easily they can be added and shared particularly for whole modules of functions. The user can either copy the full commented code for a function or module of functions and paste this directly into the AFE editor window or download the code from a GitHub Gist URL. This means that a repository of finalised and maintained functions can be hosted online and then users can simply import the required functions/modules for their project from the appropriate Gist URL. Once imported from the URL, the functions and any comments are stored in the Excel file and access to the internet and Gist is no longer required in order to use the function(s) in that Excel file.

    Function Documentation

    An important aspect of the native Excel functions is the readily available documentation. If you are unsure of how an Excel worksheet function works, or what an error code might indicate, a quick Google search will lead you to not only to the official Microsoft documentation, but also a list of third party articles and videos explaining how to use that function and its input parameters.

    This is where any custom functions can fall down if you intend to share them with others or include them in projects that will not be maintained by the function author.

    Potential options for providing documentation for your custom functions include:

    • Name Manager
      • As custom LAMBDA() functions are defined as Names, you can use the Comments property for the name to add descriptive text. This Comment text will be saved with the function within the Workbook and so accessible to all users who access the file.
      • However, there is a limit on the string length that you can save in the Comment property of 255 characters. Additionally, although you can use new lines / line breaks, they will be counted in your character limit and are not displayed as line breaks when accessed so are not ideal for function help documentation.
      • The Comment property does have its place though, as the text in the Comment property for a defined custom function will be displayed when the user choses your function in a formula, and so can be useful brief descriptor of the functions intended use
    • Excel Labs Advanced Formula Environment Modules
      • As discussed above, the Excel Labs AFE allows for extensive and formatted code commenting. This means that you can provide all of the necessary code commenting you might want within the function and module definition code.
      • This code commenting is saved in the Workbook along with the defined function(s) and so is accessible to anyone with a copy of the file. However, it requires use of the Excel Labs add-in to access and needs the user to know how to access the information.
    • Online documentation (e.g. Gist / GitHub)
      • Another option would be hosting documentation for any custom functions in the same place that they are hosted. For example, I have taken to creating individual Gists for each new function or module that is created. This allows for the help documentation to be hosted in the same place that code for the function is hosted.
      • I also use a public GitHub repository to host copies of Excel files which contain copies of my custom functions along with development information and help documentation within the same file.
      • The main issue with these methods is that the documentation is not stored with the function in the Workbook where the functions are being used. Therefore, the user needs to know where to look for the information. Although, pointing the user to a URL is much easier than some other methods, and could be easily incorporated into a defined Name Comment property for example.
    • The .About() Function
      • When I first saw Craig Hatmaker’s take on this problem I was impressed and inspired (see my earlier post in which I talk about Craig Hatmaker’s 5G project). He chose to incorporate the function help information into the function itself — all of the parameters for the function are made optional and if the user omits all inputs (i.e. simply =MyFunction()) then the function outputs an array of help information, telling the user what the function does and what the expected input parameters are.
      • For my own functions, I chose not to take this approach as I wanted to keep the distinction of required and optional parameters, and I felt that including the required extra code for this functionality would make all of the functions overly long, especially as I wanted to include input validation and error handling.
      • Instead, for my function modules I chose to add an extra .About() function to the module which could provide useful information about the module itself as well help documentation about each of the functions in the module.

    About() Function

    For the .About() function, the idea was to use a single optional select_function parameter, which can be used to choose the function in the module to provide information about.

    • If the optional select_function parameter is omitted, then the function returns information about the module including the names of the included functions and an index number for each.
    • If the optional select_function parameter is provided as a number, then the function returns the information for the corresponding module function.
    • If the optional select_function parameter is provided as a text string, then the function will try to match the input string against the list of included function names and return information on the matching module function.

    Below is an example of an About() function implementing the above approach for a module containing three custom functions.

    = LAMBDA(
      // Parameter declaration
      [select_function],
      // Main function body
      LET(
        // Deal with the optional input parameter;
        // determine if the input is omitted, or if a number or text is supplied
        _num, IF( ISOMITTED(select_function), 0,
          IF( ISNUMBER(select_function), INT(select_function), "#")
        ),
        // Create the output array for information about the module as a whole as required
        _arrDef, IF(_num = 0, TEXTSPLIT(
          "About:¬RXL example functions.|" &
          "¬Suggested module name = RXL_Demo|" &
          "Version:¬v1.01  (March 2025)|" &
          "Author:¬R Silk, RXL Development|" &
          "URL:¬https://gist.github.com/...|"&
          "¬|" &
          "Function¬Description|" &
          "0 - About¬Provides information about the functions in this module|" &
          "1 - Demo_One¬Description of the action of the Demo_One function|" &
          "2 - Demo_Two¬Description of the action of the Demo_Two function|" &
          "3 - Demo_Three¬Description of the action of the Demo_Three function",
          "¬", "|"),
          ""
        ),
        // Creates an array of the function names in the module to match user input against
        _arrNames, TEXTSPLIT(
          "Demo_One¦" &
          "Demo_Two¦" &
          "Demo_Three",
          "¦"
        ),
        // Creates the array of function documentation
        _arrHelp, TEXTSPLIT(
          "NAME:¬Demo_One|" &
          "DESCRIPTION:¬Description of the action of the Demo_One function|" &
          "VERSION:¬v1.01  (09-Mar-2025)|" &
          "PARAMETERS:¬|" &
          "range¬(required) A valid cell reference, e.g. 'Sheet1'!A1" &
          "¦" &
          "NAME:¬Demo_Two|" &
          "DESCRIPTION:¬Description of the action of the Demo_Two function|" &
          "VERSION:¬v1.01  (09-Mar-2025)|" &
          "PARAMETERS:¬|" &
          "range¬(required) A valid cell reference, e.g. 'Sheet1'!A1|" &
          "multiplier¬(optional) A number to multiply the sum result by" &
          "¦" &
          "NAME:¬Demo_Three|" &
          "DESCRIPTION:¬Description of the action of the Demo_Three function|" &
          "VERSION:¬v1.01  (09-Mar-2025)|" &
          "PARAMETERS:¬|" &
          "range¬(required) A valid cell reference, e.g. 'Sheet1'!A1|" &
          "multiplier¬(optional) A number to multiply the sum result by|" &
          "as_text¬(optional) Choose whether to output the result as text (True/False)",
          "¦"
        ),
        // Attempts to select the chose function and then 
        // splits the information string into an output array
        _arrOut, IF(_num = "#",
          LET(
            _idx, SUM( SEQUENCE(1, COUNTA(_arrNames)) * (_arrNames = select_function)),
            IF(_idx > 0, TEXTSPLIT( INDEX(_arrHelp, _idx), "¬", "|"), "#[Error: name not recognised]")
          ),
          IF(_num <> 0, IFERROR( TEXTSPLIT( INDEX(_arrHelp, _num), "¬", "|"), "#[Error: index not recognised]"),
          "")
        ),
        // Selects whether to output the general module information (_arrDef)
        // or the selected function information (_arrOut)
        IF(_arrDef = "", _arrOut, _arrDef)
      )
    )
    

    The About() function works by accepting a user input as either an index number or function name as text and then returning an output array of information for the chosen function.

    In order to reduce the number of named variables in the function and to keep the approach flexible/dynamic, the output information is stored as long text string with special characters used to indicate the separation by index (“¦“), new line (“|“), and column (“¬“). The strings are concatenated using the & operator to make the overall writing and editing more user friendly and to make the code more readable.

    First (lines 8-10), the function determines whether a value has been supplied for the optional select_function parameter, and if so whether the value is a number, otherwise it is assumed to be text.

    If no input has been supplied, then the general module information string is converted to a readable output array (_arrDef) using the TEXTSPLIT() function (lines 12-26). This default output provides the user information on the module name, module version, etc., as well as the included function names with a brief description of each module and an index number. The output array follows a simple two column structure to make it easier to read, with a title or topic in the first column and the detail in the second column.

    Next, the function creates an array of the function names (_arrNames) using the TEXTSPLIT() function (lines 28-33), which is used to match a passed function name (where the select_function input is a non-number) and determine the correct function index.

    In lines 35-57, the main function help information is split into individual strings with one string per function using the TEXTSPLIT() function (_arrHelp) and based on the separation between functions using the “¦” character.

    Once the _arrHelp array has been created, the required function index is determined using the _num variable (if a number was supplied) or the _idx variable (if a function name was supplied), and attempts to select the required function information string from _arrHelp using a simple INDEX() function call. This selected function information string is converted to an output array (_arrOut) using the TEXTSPLIT() function (lines 60-67), again following the same two column format, where the “¬” character denotes a new column and the “|” character denotes a new line / new row.

    Finally, the function either returns the created output arrays _arrDef or _arrOut depending on whether or not the user supplied an input value for the optional select_function input parameter (line 70) .

    Workbook Information Module (RXL_WbInfo)

    Below is the final, combined LAMBDA() module which incorporates the About() function, along with the SheetName(), WorkbookName(), and FilePath() functions.

    The functions are shown in outline only, concentrating instead on the format and structure of the comments, documentation, and definitions. (Details on the contents of the module functions can be found above for the About() function and in the Workbook Information Functions (Part 1) post for the other functions).

    /*
        MODULE:     RXL_WbInfo
        AUTHOR:     R Silk, RXL Development
        WEBSITE:    https://excel-bits.net
        GIST URL:   https://gist.github.com/r-silk/9c18090f60ffe442b7d22e6058e83e4a
        VERSION:    1.06 (Apr-2025)
    */
    /*
        Name:        About()
        Version:     1.10 (23-Apr-2025) -- R Silk, RXL Development
        Description: *//**Provides information about the functions in this module*//*
        Parameters:
            + select_function   = (optional) the name or index number of the function that user wants information about
        Error codes:
            #[Error: name not recognised]   = the provided name string does not match those in the module
            #[Error: index not recognised]  = the provided index number does not match those in the module
        Notes:
            - if the select_function input is omitted or an index of 0 is provided then a table of information about the module is returned
            - the user can either provide the index of the chosen function as an integer (1+), or the name of the chosen function as a string
    
    */
    About = LAMBDA(
      
      ...
      
    );
    
    /*
        Name:        SheetName()
        Version:     1.04 (23-Mar-2025) -- R Silk, RXL Development
        Description: *//**Returns the worksheet name (as displayed in the worksheet tab) for the cell reference provided; Workbook must be saved first*//*
        Parameters:
            + cell_ref      = (required) A valid cell reference, e.g. A1, or 'Sheet1'!A1
        Error codes:
            #[Error: cell reference required]   = the cell_ref parameter requires a valid cell reference
            #[Error: Workbook must be saved]    = the Workbook file must be saved first in order for the function to work correctly
            #[Error reading Sheet name]         = an error occurred getting the filename string or extracting the worksheet name from the filename string
        Notes:
            - The function outputs custom error messages as strings; these will not be flagged by Excel or any add-ins as error cells.
            - Alternatively, the custom error messages can be replaced with native Excel error codes so that the error is flagged in the normal way; 
              to do this:
                -- replace the "#[Error: cell reference required]" string with the #VALUE! (or #REF!) error code
                -- replace the "#[Error: Workbook must be saved]" and "#[Error reading Sheet name]" strings with LAMBDA(0) in order to create a #CALC! error code
    */
    SheetName = LAMBDA(
      
      ...
      
    );
    
    /*
        Name:        WorkbookName()
        Version:     1.05 (23-Mar-2025) -- R Silk, RXL Development
        Description: *//**Returns the Workbook name, with or without the file extension, for the cell reference provided; Workbook must be saved first*//*
        Parameters:
            + cell_ref          = (required) A valid cell reference, e.g. A1, or 'Sheet1'!A1
            + remove_extension  = (optional) A TRUE/FALSE or 1/0 value to determine whether to remove the file extension from the workbook filename
        Error codes:
            #[Error: cell reference required]   = the cell_ref parameter requires a valid cell reference
            #[Error: Workbook must be saved]    = the Workbook file must be saved first in order for the function to work correctly
            #[Error reading Workbook name]      = an error occurred getting the filename string or extracting the Workbook name from the filename string
        Notes:
            - The function outputs custom error messages as strings; these will not be flagged by Excel or any add-ins as error cells.
            - Alternatively, the custom error messages can be replaced with native Excel error codes so that the error is flagged in the normal way; 
              to do this:
                -- replace the "#[Error: cell reference required]" string with the #VALUE! (or #REF!) error code
                -- replace the "#[Error: Workbook must be saved]" and "#[Error reading Workbook name]" strings with LAMBDA(0) in order to create a #CALC! error code
    */
    WorkbookName = LAMBDA(
      
      ...
      
    );
    
    /*
        Name:        FilePath()
        Version:     1.04 (23-Mar-2025) -- R Silk, RXL Development
        Description: *//**Returns the Workbook file path, with or without the full file name, for the cell reference provided; Workbook must be saved first*//*
        Parameters:
            + cell_ref          = (required) A valid cell reference, e.g. A1, or 'Sheet1'!A1
            + remove_last_char  = (optional) A TRUE/FALSE or 1/0 value to determine whether to remove the last character in the file path string
            + inc_file_name     = (optional) A TRUE/FALSE or 1/0 value to determine whether to include the full file name with file extension
        Error codes:
            #[Error: cell reference required]   = the cell_ref parameter requires a valid cell reference
            #[Error: invalid optional input]    = either the remove_last_char ot inc_file_name inputs are not a logical (TRUE/FALSE) or numeric value
            #[Error: Workbook must be saved]    = the Workbook file must be saved first in order for the function to work correctly
            #[Error reading File Path]          = an error occurred getting the file name string or extracting the file path from the file name string
            #[Error reading Workbook name]      = an error occurred getting the file name string or extracting the Workbook name from the file name string
        Notes:
            - The function outputs custom error messages as strings; these will not be flagged by Excel or any add-ins as error cells.
            - Alternatively, the custom error messages can be replaced with native Excel error codes so that the error is flagged in the normal way; 
              to do this:
                -- replace the "#[Error: cell reference required]" string with the #VALUE! (or #REF!) error code
                -- replace the "#[Error: invalid optional input]" string with the #VALUE! error code
                -- replace the "#[Error: Workbook must be saved]", "#[Error reading File Path]", and "#[Error reading Sheet name]" strings with LAMBDA(0) in order to create a #CALC! error code
    */
    FilePath = LAMBDA(
      
      ...
      
    );
    

    The above shows my current preferred format for these Excel Labs AFE modules, making use of multi-line comments to provide the module and function documentation. Using comments in this way for the function documentation allows for more extensive and more verbose information but is only accessible via the Excel Labs add-in. Therefore, I also like to add in the About() function to provide more easily accessible function information on the worksheet.

    The initial comment block (lines 1-7) provides the information on the module itself including the suggested module name and version number. I then include the About() function (lines 8-26) followed by the other functions in the order in which I have included them in the About() function information strings.

    Each function is declared and defined in the standard Excel Labs AFE way, starting with the function name and ending with a semi-colon:

    Function_Name = LAMBDA( ... );

    Above each function declaration, I use a multi-line comment block to supply the corresponding function documentation (for example see lines 28-44). This will usually contain:

    • function name;
    • function version;
    • description of the functions action/intended use;
    • input parameters, including information on:
      • whether a parameter is required or optional, and
      • the expected input value(s);
    • potential function output error codes and there meaning; and
    • any additional notes on how the function is intended to work.

    Of note, the description portion of the function documentation is held in its own separate and special comment block. This comment block uses a double asterisk in the format:

    /** [Description text] */

    This is important, as this special comment format indicates to the AFE that this text should be used to populate the Comment property of the defined name that stores the function. As described above the Comment property of the defined function is then displayed to the user when selecting a function to use in their formulae.


    If you wish to use the RXL_WbInfo module (or any other AFE module) in your Excel projects, this can be easily achieved using the below steps:

    1. Ensure that you have the Microsoft Excel Labs add-in installed, and navigate to the Advanced Formula Environment (AFE) tab
    2. In the AFE choose the Modules section from the green ribbon at the top
    3. Click on the “Import from URL” button in the black ribbon (looks like a cloud with a down arrow)
    1. In the dialogue box that pops up enter the GitHub Gist URL for the RXL_WbInfo module (https://gist.github.com/r-silk/9c18090f60ffe442b7d22e6058e83e4a)
    2. Before clicking the “Import” button, check the box for “Add formulas to a new module?” and add the suggested module name to the text box that appears.

    Once the module has been uploaded, the AFE will save a copy of the full module string complete with code comments in your Excel file, which can then be read via the Excel Labs add-in. The AFE will also save copies of each defined function in the Name Manager as defined names with the specified Comments property, and so you can start using the functions by simply typing =RXL_WbInfo in the formula bar.

  • Workbook Information Functions (Part 1)

    Workbook Information Functions (Part 1)

    In previous financial models and Excel projects I have worked on, the basic template worksheet has often included a formula in cell A1 (or similar) which dynamically returns the worksheet name (as per the text in the worksheet tab) to display as the worksheet title. This means that if the worksheet name is updated, the worksheet title also automatically updates.

    This is achieved using the CELL() function, which can be used to output the worksheet file name in a standardised format:

    C:\Your\File\Path\[File_name.xlsx]Sheet_Name

    The file path is always shown first, followed by the file name with file extension, enclosed within the square brackets (“[ ]”), and finally the worksheet name for the cell reference provided to the CELL() function.

    Excel restricts the use of certain characters in a valid Excel file name and worksheet name, including the “[” and “]” characters. This means that the last “[” and “]” characters in the CELL() file name string can be reliably used to find separate out the worksheet name, file name and file path.

    In a previous post about my development of a TextBetween() function, I showed examples of formulae to extract the file path, file name, and worksheet name from the CELL() function output, particularly using the newer TEXTAFTER() and TEXTBEFORE() functions (see screen shot below). Following this, I thought it might be a fun exercise to build a set of custom functions which a user could use to extract this useful workbook information dynamically and simply.

    The Workbook Information functions module (RXL_WbInfo) is made up of three custom LAMBDA() functions. The rest of this post details how the functions work, and the next post (Workbook Information Functions (Part 2)) will explain how the Excel Labs Advanced Formula Environment (AFE) can be used to create a module of complimentary LAMBDA() functions.

    All of the functions outlined below have been designed to look and feel like native Excel functions, including required and optional parameters as appropriate, as well including input validation checks, error handling, and custom error messages. The code displayed in this post has been made to be more easily read and understood with new lines, additional spacing, indentation, and code commenting.

    The version of the Workbook Information functions included here use custom error messages rather than standard Excel error codes (“# values”). I felt that as these functions are less likely to be used in any crucial calculations and are more likely to be used mainly for dynamic display of Workbook details on information worksheets or worksheet titles, this was a good opportunity to demonstrate using such custom error messages. For further discussion on the topic of error messages in custom LAMBDA() functions please see my previous post.

    A. SheetName()

    The SheetName() function is the simplest of the three functions with a single input parameter required; a valid cell reference.

    = LAMBDA(
      // Parameter definition
      cell_ref,
      // Main function body/calculations
      LET(
        // Check that input provided is as cell reference, otherwise create a custom error message
        _inpChk, IF( NOT(ISREF(cell_ref)), "#[Error: cell reference required]", ""),
        // Get the filename string using the native CELL() function and the cell_ref argument
        _fileName, CELL("filename", cell_ref),
        // Use the TEXTAFTER() function to look for the final "]" character in the filename string
        // If no matching "]" character is found then return an empty string
        _wsName, IF(_fileName <> "", TEXTAFTER( _fileName, "]", -1, , , "#"), "#[Error: Workbook must be saved]"),
        // Check for an error value or empty string and if found return a custom error message, otherwise return the worksheet name string
        _rtn, IF( OR( ISERROR(_wsName), _wsName = "#"), "#[Error reading Sheet name]", _wsName),
        // Final check to see if there was an input error, and if so return the custom error message
        IF(_inpChk <> "", _inpChk, _rtn)
      )
    )
    

    The function uses a LET() function after the parameter declarations (line 5), to enable staged calculations and additional temporary variables within the main LAMBDA() calculation.

    The first part of the calculations is an input validation check (lines 6-7), which ensures that the cell_ref input provided is a valid cell reference.

    Next the CELL() function is used to get the full file name string output in the _fileName variable (lines 8-9). Then, the TEXTAFTER() function is used to get text after the last “]” character (instance number -1), which based on the expected CELL() function output, will represent the worksheet name for the cell reference provided (lines 10-12).

    If the _fileName variable is a blank string then this suggests that the Workbook for the cell reference provided is not saved, and so we return an appropriate error message.

    The result of the TEXTAFTER() function call (as per the _wsName variable) is checked, and if an error has occurred then an appropriate error message is provided as the _rtn variable otherwise the extracted worksheet name is used (lines 13-14).

    Finally, the function uses an IF() statement to check whether the input validation check has flagged (lines 15-16) in which case the created error message is returned; if not the _rtn variable is returned, having already undergone error handling during the calculation of the _rtn variable value.

    B. WorkbookName()

    As with the SheetName() function, the WorkbookName() function requires a single valid cell reference as the main input parameter (cell_ref) but also includes the remove_extension optional parameter to add additional functionality.

    • If the input is TRUE the file name without file type extension is returned (equivalent to the Workbook name), otherwise the full file name including the file type extension is returned.
    = LAMBDA(
      // Parameter definitions
      cell_ref,
      [remove_extension],
      // Main function body/calculations
      LET(
        // Update the optional input to a default of False if omitted or a non-Boolean/non-numeric value is supplied
        _extChk, AND( NOT(ISLOGICAL(remove_extension)), NOT(ISNUMBER(remove_extension))),
        _fileExt, IF( 
          OR( ISOMITTED(remove_extension), _extChk), 
          FALSE,
          remove_extension
        ),
        // Check that the cell_ref input supplied is a valid cell reference
        _inpChk, IF( 
          NOT(ISREF(cell_ref)), 
          "#[Error: cell reference required]", 
          ""
        ),
        // Get the filename string using the native CELL() function and the cell_ref argument
        _fileName, CELL("filename", cell_ref),
        // Use a combination of the TEXTAFTER() and TEXTBEFORE() functions to get the workbook name from the filename string
        _strName, TEXTBEFORE( TEXTAFTER(_fileName, "[", -1, , , "#"), "]", -1, , , "#"),
        // Remove the file extension from the workbook name string as required
        _wbName, IF(
          _fileExt, 
          TEXTBEFORE(_strName, ".", -1, , , _strName), 
          _strName
        ),
        // Determine whether to return an error message or the workbook name string
        _rtn, IFS(
          _fileName = "", "#[Error: Workbook must be saved]",
          OR( ISERROR(_wbName), _wbName = "#"), "#[Error reading Workbook name]", 
          TRUE, _wbName
        ),
        // Finally determine whether to return an input error message or the return string
        IF(_inpChk <> "", _inpChk, _rtn)
      )
    )
    

    The function uses a LET() function after the parameter declarations (line 6), to enable staged calculations and additional temporary variables within the main LAMBDA() calculation.

    First, the function deals with the optional remove_extension input parameter (lines 7-13) and sets a default value of FALSE if no input value is provided by the user or an invalid input value is provided.

    Next, the function performs input validation checks (lines 14-19) via the _inpChk variable, which check that the cell_ref input provided is a valid cell reference as required by the CELL() function.

    The function uses the CELL() function to get the full file name output for the referenced cell (_fileName variable; lines 20-21), and then a combination of nested TEXTAFTER() and TEXTBEFORE() functions to extract the referenced Workbook file name (_strName variable; lines 22-23). As previously described, the last “[” and “]” characters (delimiter instance -1) are used as for this step as these are invalid characters for the Excel file name and Worksheet name and so will only be seen encompassing the Workbook file name in the expected CELL() function output.

    If the user has chosen to use the remove_extension optional parameter, the _wbName variable will either the return the full text of the _strName variable (including the file extension) or use the TEXTBEFORE() function to return the text up to the last “.” character in the _strName text (lines 24-29).

    The _rtn variable calculations provide error handling for the main calculations (lines 30-35). If the _fileName variable from the CELL() function output is a blank string this suggests that the referenced Workbook is not saved and so an appropriate error message is provided. If either the “[” or “]” characters were not found as expected in the previous steps, then an appropriate, more general error message is provided.

    The final step in the calculations (lines 36-37) checks whether an input check was flagged and returns the created error message, otherwise the error handled _rtn variable value is returned.

    C. FilePath()

    The FilePath() function is the most complex and flexible of the three functions. It again requires a valid cell reference for the main cell_ref input parameter, and provides two optional parameters:

    • remove_las_char = if the input is TRUE, then the full file path is returned without the trailing “\” or “/” character
    • inc_file_name = if the input is TRUE, then the full file path is returned along with the file name including the file type extension
    = LAMBDA(
      // Parameter definitions
      cell_ref,
      [remove_last_char],
      [inc_file_name],
      // Main function body/calculations
      LET(
        // Input checks
        _chrChk, AND( NOT(ISOMITTED(remove_last_char)), NOT(ISLOGICAL(remove_last_char)), NOT(ISNUMBER(remove_last_char))),
        _fnmChk, AND( NOT(ISOMITTED(inc_file_name)), NOT(ISLOGICAL(inc_file_name)), NOT(ISNUMBER(inc_file_name))),
        _refChk, NOT(ISREF(cell_ref)),
        // Dealing with optional parameters, setting default values if omitted
        _lastChr, IF(
          OR( ISOMITTED(remove_last_char), _chrChk),
          FALSE,
          remove_last_char
        ),
        _incFile, IF(
          OR( ISOMITTED(inc_file_name), _fnmChk),
          FALSE,
          inc_file_name
        ),
        // Get the full file path and name
        _full, CELL("filename", cell_ref),
        // Extract the file path only
        _path, TEXTBEFORE(_full, "[", -1, , , "#"),
        _filePath, IF(_lastChr,
          LEFT(_path, LEN(_path) - 1),
          _path
        ),
        // Extract the Workbook name element inc. file extension
        _wbName, TEXTBEFORE( TEXTAFTER(_full, "[", -1, , , "#"), "]", -1, , , "#"),
        // Check for input errors and calculation errors, and set the appropriate error message
        // Note - errors placed in order of importance/reporting as only a single message is returned for multiple errors
        _errChk, IFS(
          _refChk, "#[Error: cell reference required]",
          _full = "", "#[Error: Workbook must be saved]",
          OR(_chrChk, _fnmChk), "#[Error: invalid optional input]",
          OR( ISERROR(_filePath), _filePath = "#"), "#[Error reading File Path]",
          AND( OR( ISERROR(_wbName), _wbName = "#"), _incFile), "#[Error reading Workbook Name]",
          TRUE, ""
        ),
        // Construct the required output string
        _rtn, IF(_incFile,
          _path & _wbName,
          _filePath
        ),
        // Final check - if an error message is present return that, otherwise return the constructed output string
        IF(_errChk <> "", _errChk, _rtn)
      )
    )
    

    The function uses a LET() function after the parameter declarations (line 7), to enable staged calculations and additional temporary variables within the main LAMBDA() calculation.

    First, the function performs input validation checks (lines 8-11) to ensure that any inputs provided are valid. After this the function deals with the optional parameters remove_last_char and inc_file_name, and assigns default values of FALSE if either is omitted by the user (lines 12-22).

    Next, the function uses the CELL() function to get the full file path for the referenced cell (lines 23-26), and then uses the TEXTBEFORE() function to extract the text before the last instance of the “[” character (delimiter instance number -1). Based on the expected output format of the CELL() function, the final character before the last instance of the “[” character will either be a “\” or “/” character, depending on the referenced file location. As there may be circumstances where the user wants to provide the file path as the folder description only, there is the option to remove this trailing character using the remove_last_char parameter (lines 27-30).

    The Workbook name is also extracted from the CELL() function output (_fileName) and stored as the _wbName variable (lines 31-32).

    Next, error handling is performed to check if any of the input validation checks have failed or if an error has occurred during the preceding main calculations (lines 33-42). This is achieved using an IFS() statement, where the more important errors will trigger first and so the single custom error message will be provided in a hierarchical manner – i.e. invalid inputs come before calculation errors in the reporting to the user for debugging purposes.

    After this the required output string is constructed and stored in the _rtn variable (lines 43-47). If the user has chosen to use the inc_file_name optional parameter, then the full file path (including trailing character) is provided (_path variable) with the full file name and file type extension (_wbName variable); otherwise, the adjusted file path string is used (_filePath variable).

    Lastly, an IF() statement is used to check if an appropriate error message was returned from lines 35-42 (_errChk variable), and if so this is returned to the user as the function output; otherwise the calculated string in the _rtn variable is returned (lines 48-49).


    If you want to see further information on the development and documentation of the above three functions then I have provided an Excel file (RXL_WbInfo.xlsx) which you can download and explore at the following GitHub repository:

    https://github.com/r-silk/RXL_Lambdas

    The file contains a page on each of the function with the final versions of the functions as seen above as well as version of the functions which do not use the newer TEXTBEFORE() and TEXTAFTER() functions and instead demonstrate how the same functionality can be achieved with older Excel functions and approaches. There is also a “Demo” worksheet which demonstrates the outputs from each function using the main input parameter combinations.

    The file contains a copy of each function in the Defined Names manager which can be copied into your own file, or alternatively there is a “minimised” version of each function which can be copied and pasted directly into the Name Manager when defining a new name in your own files — please use the suggested function names when using this method:

    • RXL_SheetName()
    • RXL_WorkbookName()
    • RXL_FilePath()

    Finally, there Gist URLs for each of the functions, however, I would encourage you to read the next post (Workbook Information Functions (Part 2)) and use the Gist URL for the RXL_WbInfo module instead if you are intending on adding these functions to an Excel file via the Excel Labs Advanced Formula Environment (AFE).

  • TextBetween Function

    TextBetween Function

    As someone who remembers the challenges of getting just a part of a longer string using the older Excel functions, I was very excited when the new TEXTAFTER() and TEXTBEFORE() functions were introduced to Excel.

    The Old Way

    Previously in Excel, to get all of the text before or after a particular character (or delimiter) you needed to use a combination of the FIND() and LEN() functions within a RIGHT() or LEFT() function. This approach involves finding the numeric position of the chosen delimiter using the FIND() function and then returning the correct number of characters from the chosen side of the delimiter, via the LEN() function, within a RIGHT() function for text after a delimiter, or LEFT() function for text before the delimiter.

    // For text before the delimiter
    = LEFT( [text] , FIND( [delimiter], [text] ) – LEN( [delimiter] )) 
    // For text after the delimiter
    = RIGHT( [text] , LEN( [text] ) – FIND( [delimiter], [text] ))


    To get the text between two different delimiters using the above approaches can get quite complicated and end up with a complex, nested formula which is difficult to read. Equally, using this approach, finding a specific delimiter where there are multiple such delimiters in the source text string is possible but can get very complicated, e.g. finding the last “.” character in a string using FIND() is challenging.

    Fortunately, there is the MID() function for returning the text from a source string starting at a specified character and going for a stated number of characters.

    // For text between two different delimiters
    = MID( [text] , FIND( [left_delim] , [text] ) + LEN( [left_delim] ), FIND( [right_delim] , [text] ) - (FIND( [left_delim] , [text] ) + LEN( [left_delim] )))


    For some more real-life examples, we can look at using the CELL() function to dynamically extract the worksheet name, file name, and file path.

    To get the worksheet name from the CELL() function output, requires getting the text after the last “]” character which we can achieve using the RIGHT() and FIND() functions. To get the Workbook file name we need to the text between the “[“ and “]” characters, which can be achieved using the MID() function. Even for the relatively simple worksheet name this approach requires three calls to the CELL() function.

    This can be improved using the LET() function as shown below so that only a single CELL() function call is needed but us still more complicated and less easy to understand than using the newer TEXTAFTER() and TEXTBEFORE() functions.

    Additionally, the use of the LET() function to define both the source text string (_file) and the delimiters (_d1, _d2), shows how a more generic formula can be created to find the text between delimiters. However, the FIND() function means that only the first instance of each delimiter is used which could lead to unexpected behaviour.

    The New Way

    The major advantages of the new TEXTBEFORE() and TEXTAFTER() functions are:

    • the ability to get the full text from either side of a delimiter character(s) with a single function call;
    • the ability to specify a particular instance of a delimiter character(s) rather than stopping at the first instance that is found; and
    • the ability to search from either the start of the string or the end of the string.

    By using the same CELL() based examples above, the improvement in formula simplicity and readability using TEXTBEFORE() and TEXTAFTER() is clear.

    In order to extract the file name from the CELL() function output still requires nested functions as there is not new equivalent to the MID() function. However, the nested TEXTAFTER() and TEXTBEFORE() functions are still simpler, and arguably easier to read, than the use of the MID() function with nested FIND() and LEN() functions.

    TextBetween() Function

    That was the idea behind the TextBetween() function — use the TEXTAFTER() and TEXTBEFORE() functions to re-create a MID() style function but with all of the advantages and user-friendliness of the new TEXT functions.

    The plan for the custom function was relatively simple and straight forward:

    • create a single function call to mimic the MID() function but that can be achieved with three user inputs
      • input text string (source string)
      • start delimiter character(s)
      • end delimiter character(s)
    • maintain the good aspects of the TEXTAFTER() and TEXTBEFORE() functions
      • i.e. the ability to specify an instance number of the delimiters, and the ability to search from the start or end of the input string
    • make the function feel like a native Excel function with optional parameters, as well as adding in input validation, error handling, etc.

    As always seems to be the case when I build a custom worksheet function, “feature creep” soon added extra flexibility but at the cost of increased complexity and more optional parameters for the user.

    The full function is shown below in a more readable version (lines, spacing, and indentation) along with code commenting.

    = LAMBDA(
      // Parameter definitions
      text,
      [start_delimiter],
      [end_delimiter],
      [start_instance],
      [end_instance],
      [case_sensitive],
      [if_not_found],
      // Main function body/calculations
      LET(
        // Deal with [optional] parameters and set default values  
        _delimA, IF( OR( ISOMITTED(start_delimiter), ISBLANK(start_delimiter)), "", start_delimiter),
        _delimB, IF( OR( ISOMITTED(end_delimiter), ISBLANK(end_delimiter)), "", end_delimiter),
        _instA, IF( OR( ISOMITTED(start_instance), ISBLANK(start_instance)), 1, INT(start_instance)),
        _instB, IF( OR( ISOMITTED(end_instance), ISBLANK(end_instance)), -1, INT(end_instance)),
        _case, IF( ISOMITTED(case_sensitive), 0, IF(case_sensitive, 0, 1)),
        // Additional input checking for the if_not_found parameter in order to provide #N/A result 
        // when no return string is calculated rather than a #VALUE! Result
        _inf, IF(
          OR( ISOMITTED(if_not_found), ISBLANK(if_not_found), if_not_found = "", AND( 
          ISLOGICAL(if_not_found), if_not_found = FALSE)),
          NA(),
          IF( ISLOGICAL(if_not_found), text, if_not_found)
        ),
        _end, IF( ISLOGICAL(if_not_found), if_not_found * 1, 0),
        // Check for invalid input values -- returns value of: 0 = no input errors; >0 = input error(s) 
        // identified this is placed after dealing with optional parameter default values so that an 
        // omitted input does not register an input error
        _inpChk, IF(
          OR(
            NOT(ISNUMBER(_instA)), _instA = 0,
            NOT(ISNUMBER(_instB)), _instB = 0,
            AND( NOT(ISLOGICAL(_case)), NOT(ISNUMBER(_case)))
          ),
          2,
          1
        ),
        // Calculate the output string using TEXTAFTER() and TEXTBEFORE() functions
        _calc, IF( OR( AND(_delimA = "", _delimB = "")),
          text,
          TEXTBEFORE( TEXTAFTER(text, _delimA, _instA, _case, _end, _inf), _delimB, _instB, _case, , _inf)
        ),
        // For the final calculation output, if the an input error check message/code is present return 
        // that, otherwise return the output string
        _rtn, IF( AND( ISERROR(_calc), _end = 1), text, _calc),
        CHOOSE(_inpChk, _rtn, #VALUE!)
      )
    )
    

    The TextBetween() function only has a single required parameter being the input text (line 3). If only this parameter is provided, the function will simply return the input string as it is.

    It may seem counter-intuitive to not require the user to enter both the start and end delimiter input parameters, but this was designed so that the user could chose to provide only a start delimiter, only an end delimiter, or both.

    • If only the start_delimiter parameter, is provided, the function will act like the TEXTAFTER() function and return the text after the start_delimiter character(s).
    • If only the end_delimiter parameter is provided, the function will act like the TEXTBEFORE() function and return the text after the end_delimiter character(s).
    • If both the start_delimiter and end_delimiter parameters are provided, the function will act like the MID() function and return the text between the delimiter characters.

    The delimiter instance numbers are optional input parameters. If provided they act in the same way as the delimiter instance inputs in the TEXTAFTER() and TEXTBEFORE() functions:

    • a positive value (+1) will search forwards for the delimiter character(s) from the start of the input text string
    • a negative value (-1) will search in reverse for the delimiter character(s) from the end of the input text string

    Where the delimiter instance values are not used, the start_instance input will default to +1 and the end_instance input will default to -1, meaning that the first instance of the start_delimiter is used and the last instance (or first in reverse) of the end_delimiter is used. In this way, the maximum text is returned from the input text string.

    As is my preferred style, the main function calculations and output (after the parameter declarations), are within a LET() function to allow for staged calculation steps and the use of additional temporary variables (line 11).

    The first part of the function (lines 12-17) deals with the optional input parameters and sets default values if the user has chosen not to use those parameters.

    There is additional checking for the if_not_found parameter (lines 18-25) as this provides additional functionality. This optional input parameter allows the user to set how the function will act if the delimiter character(s) are not found in the input text string.

    • By default, the function will return a #N/A error when the delimiter characters are not found in the input string.
    • If the user provides a FALSE value to the if_not_found input parameter, the function will return a #N/A error if the delimiter characters not found.
    • If the user provides a TRUE value to the if_not_found input parameter, the function will return the original input text string (text) if the delimiter characters are not found.
    • If the user provides a value/text to the if_not_found input parameter (e.g. “(not found)” ) then this value/text is returned by the function in the case that the delimiter characters are not found.

    Next, the function performs some simple input validation (lines 26-36). If these input validation checks fail, then the _inpChk variable is set to a number other than 1.

    After dealing with the optional parameters and input validation checks, the actual calculations are performed within the _calc and _rtn variables (lines 37-43).

    Finally, the function uses a CHOOSE() function to determine the correct output to return (line 44). If the input validation checks are flagged as failed (_inpChk value > 1), then the appropriate error value or error message is returned, otherwise the adjusted, calculated output value is returned (as per the _rtn variable).


    If you want to use the TextBetween() function in your own projects or custom functions, please use one of the options below:

    1. Using Excel Labs Advanced Formula Environment (AFE) download the function using the Gist URL https://gist.github.com/r-silk/b33b16e634e1ff6aa054cd6149964d80
    2. Alternatively, go to the GitHub repository https://github.com/r-silk/RXL_Lambdas and download the file RXL_TextBetween.xlsx
      • this file contains a copy of the function in the Defined Names which can be copied into your own file
      • there is also a “minimised” version of the function which can be copied and pasted directly into the Name Manager when defining a new name of your own — please use the suggested function name of RXL_TextBetween
      • the available file contains the documentation for the function as well as some details on development and testing/example usage