Tag: LAMBDA()

  • Workbook Information Functions (Part 2)

    Workbook Information Functions (Part 2)

    In my last post (Workbook Information Functions (Part 1)) I described three custom LAMBDA() functions which could be used to dynamically get useful information about a referenced Excel file, such as:

    • Worksheet name;
    • Workbook name and file type extension; and
    • file path.

    These three functions are relatively simple, work in very similar ways, and are complimentary. As such, they are a great candidate to demonstrate how a module of LAMBDA() functions can be created and maintained using the Excel Labs Advanced Formula Environment.

    Excel Labs Advanced Formula Environment

    Excel Labs is a free Excel add-in created by the Microsoft Garage Projects team. It can be downloaded from Microsoft AppSource and once installed can be accessed via a new “Excel Labs” button on the Excel Home ribbon.

    The Excel Labs add-in has three elements to it:

    My preference is to set the AFE as the default feature for Excel Labs so this is what opens automatically when I open Excel Labs. The Python Editor is excellent, but since Excel added a Python editor to standard Excel it is no longer really needed. Similarly, the LABS.GENERATIVEAI() function is fun to play around with, but I rarely ever use it and the page that opens from the Excel Labs add-in is only a setup and settings window so is not needed that often.

    The AFE window provides three tabs within the top green ribbon:

    • Grid
      • Provides a formula editor for the cell that is currently selected.
      • The formula editor is more like a traditional code IDE with auto-completion, syntax suggestions, syntax highlighting, error highlighting, and code commenting.
      • There is also a formula debugger for your standard Excel formulae which shows you the steps in the formula being edited in execution order and the result at each stage.
    • Names
      • Provides a manager and editor for defined names.
      • The defined names are split by type/category into Functions, Ranges, Formulas, and Modules.
    • Modules
      • Provides an IDE and editor for each module of defined names/functions.
      • In this format, each module is shown as a single text file with the defined function that make up the module included in the same text file in a set format.
      • By using a module, users can import multiple functions together as a single block of text or from a single Gist URL.

    LAMBDA() Modules

    In the Excel Labs AFE, modules are presented as a single block of text, similar to a single text file in Notepad, which can use line breaks and tab characters to format the text. Each function defined and stored within the module follows the format of:

    Function_Name = LAMBDA(
      ...
    );
    

    You can choose to either add individual functions to the general Workbook module, in which case they will use the name that they are declared with (e.g. =Function_Name() ), or you can add them to a defined module, in which case the function is used with module name and the function name, e.g. =Module.Function_Name().

    The AFE allows for the use of code commenting which can help in documenting and explaining any custom functions you create. The comments can be made as individual new lines with the “//” characters, they can be added to the end of a line of code again using the “//” characters, or you can create a multi-line block of comments using the “/*” characters at the start of the block and ending with “*/“.

    As can be seen in the image above as well as allowing for code comments the AFE editor will colour different syntax elements of a formula code to help distinguish them when reading and editing a formula. The editor also provides auto-completion suggestions as you type and will highlight any formula errors with red underlining to help in debugging your code as you type.

    When the AFE is used in this way to create or edit a custom function, the contents of the AFE formula editor window are saved within the Excel file that you are using in its fully formatted version including any new lines, indentation, and code comments. When you then save the edited function (using the save button in the Excel Labs ribbon), a further copy of the code for each function is created, where all code comments are removed along with superfluous formatting characters, and this copy is saved as a standard Excel Defined Name. It is the Defined Name version which is then used by the Excel file when the user uses a custom function in a worksheet formula as the code comments are not allowed in a valid defined function.

    As such, it is important that if you are using the AFE to create custom functions that any editing of these functions is performed in the AFE editor window rather than directly in the Excel Name Manager otherwise the version of the function code seen in the AFE may not match that seen in the Name Manager and any changes made to a function in the Name Manager will be over-written by the AFE the next time the module/function is saved.

    A major advantage of using Excel Labs for custom functions is how easily they can be added and shared particularly for whole modules of functions. The user can either copy the full commented code for a function or module of functions and paste this directly into the AFE editor window or download the code from a GitHub Gist URL. This means that a repository of finalised and maintained functions can be hosted online and then users can simply import the required functions/modules for their project from the appropriate Gist URL. Once imported from the URL, the functions and any comments are stored in the Excel file and access to the internet and Gist is no longer required in order to use the function(s) in that Excel file.

    Function Documentation

    An important aspect of the native Excel functions is the readily available documentation. If you are unsure of how an Excel worksheet function works, or what an error code might indicate, a quick Google search will lead you to not only to the official Microsoft documentation, but also a list of third party articles and videos explaining how to use that function and its input parameters.

    This is where any custom functions can fall down if you intend to share them with others or include them in projects that will not be maintained by the function author.

    Potential options for providing documentation for your custom functions include:

    • Name Manager
      • As custom LAMBDA() functions are defined as Names, you can use the Comments property for the name to add descriptive text. This Comment text will be saved with the function within the Workbook and so accessible to all users who access the file.
      • However, there is a limit on the string length that you can save in the Comment property of 255 characters. Additionally, although you can use new lines / line breaks, they will be counted in your character limit and are not displayed as line breaks when accessed so are not ideal for function help documentation.
      • The Comment property does have its place though, as the text in the Comment property for a defined custom function will be displayed when the user choses your function in a formula, and so can be useful brief descriptor of the functions intended use
    • Excel Labs Advanced Formula Environment Modules
      • As discussed above, the Excel Labs AFE allows for extensive and formatted code commenting. This means that you can provide all of the necessary code commenting you might want within the function and module definition code.
      • This code commenting is saved in the Workbook along with the defined function(s) and so is accessible to anyone with a copy of the file. However, it requires use of the Excel Labs add-in to access and needs the user to know how to access the information.
    • Online documentation (e.g. Gist / GitHub)
      • Another option would be hosting documentation for any custom functions in the same place that they are hosted. For example, I have taken to creating individual Gists for each new function or module that is created. This allows for the help documentation to be hosted in the same place that code for the function is hosted.
      • I also use a public GitHub repository to host copies of Excel files which contain copies of my custom functions along with development information and help documentation within the same file.
      • The main issue with these methods is that the documentation is not stored with the function in the Workbook where the functions are being used. Therefore, the user needs to know where to look for the information. Although, pointing the user to a URL is much easier than some other methods, and could be easily incorporated into a defined Name Comment property for example.
    • The .About() Function
      • When I first saw Craig Hatmaker’s take on this problem I was impressed and inspired (see my earlier post in which I talk about Craig Hatmaker’s 5G project). He chose to incorporate the function help information into the function itself — all of the parameters for the function are made optional and if the user omits all inputs (i.e. simply =MyFunction()) then the function outputs an array of help information, telling the user what the function does and what the expected input parameters are.
      • For my own functions, I chose not to take this approach as I wanted to keep the distinction of required and optional parameters, and I felt that including the required extra code for this functionality would make all of the functions overly long, especially as I wanted to include input validation and error handling.
      • Instead, for my function modules I chose to add an extra .About() function to the module which could provide useful information about the module itself as well help documentation about each of the functions in the module.

    About() Function

    For the .About() function, the idea was to use a single optional select_function parameter, which can be used to choose the function in the module to provide information about.

    • If the optional select_function parameter is omitted, then the function returns information about the module including the names of the included functions and an index number for each.
    • If the optional select_function parameter is provided as a number, then the function returns the information for the corresponding module function.
    • If the optional select_function parameter is provided as a text string, then the function will try to match the input string against the list of included function names and return information on the matching module function.

    Below is an example of an About() function implementing the above approach for a module containing three custom functions.

    = LAMBDA(
      // Parameter declaration
      [select_function],
      // Main function body
      LET(
        // Deal with the optional input parameter;
        // determine if the input is omitted, or if a number or text is supplied
        _num, IF( ISOMITTED(select_function), 0,
          IF( ISNUMBER(select_function), INT(select_function), "#")
        ),
        // Create the output array for information about the module as a whole as required
        _arrDef, IF(_num = 0, TEXTSPLIT(
          "About:¬RXL example functions.|" &
          "¬Suggested module name = RXL_Demo|" &
          "Version:¬v1.01  (March 2025)|" &
          "Author:¬R Silk, RXL Development|" &
          "URL:¬https://gist.github.com/...|"&
          "¬|" &
          "Function¬Description|" &
          "0 - About¬Provides information about the functions in this module|" &
          "1 - Demo_One¬Description of the action of the Demo_One function|" &
          "2 - Demo_Two¬Description of the action of the Demo_Two function|" &
          "3 - Demo_Three¬Description of the action of the Demo_Three function",
          "¬", "|"),
          ""
        ),
        // Creates an array of the function names in the module to match user input against
        _arrNames, TEXTSPLIT(
          "Demo_One¦" &
          "Demo_Two¦" &
          "Demo_Three",
          "¦"
        ),
        // Creates the array of function documentation
        _arrHelp, TEXTSPLIT(
          "NAME:¬Demo_One|" &
          "DESCRIPTION:¬Description of the action of the Demo_One function|" &
          "VERSION:¬v1.01  (09-Mar-2025)|" &
          "PARAMETERS:¬|" &
          "range¬(required) A valid cell reference, e.g. 'Sheet1'!A1" &
          "¦" &
          "NAME:¬Demo_Two|" &
          "DESCRIPTION:¬Description of the action of the Demo_Two function|" &
          "VERSION:¬v1.01  (09-Mar-2025)|" &
          "PARAMETERS:¬|" &
          "range¬(required) A valid cell reference, e.g. 'Sheet1'!A1|" &
          "multiplier¬(optional) A number to multiply the sum result by" &
          "¦" &
          "NAME:¬Demo_Three|" &
          "DESCRIPTION:¬Description of the action of the Demo_Three function|" &
          "VERSION:¬v1.01  (09-Mar-2025)|" &
          "PARAMETERS:¬|" &
          "range¬(required) A valid cell reference, e.g. 'Sheet1'!A1|" &
          "multiplier¬(optional) A number to multiply the sum result by|" &
          "as_text¬(optional) Choose whether to output the result as text (True/False)",
          "¦"
        ),
        // Attempts to select the chose function and then 
        // splits the information string into an output array
        _arrOut, IF(_num = "#",
          LET(
            _idx, SUM( SEQUENCE(1, COUNTA(_arrNames)) * (_arrNames = select_function)),
            IF(_idx > 0, TEXTSPLIT( INDEX(_arrHelp, _idx), "¬", "|"), "#[Error: name not recognised]")
          ),
          IF(_num <> 0, IFERROR( TEXTSPLIT( INDEX(_arrHelp, _num), "¬", "|"), "#[Error: index not recognised]"),
          "")
        ),
        // Selects whether to output the general module information (_arrDef)
        // or the selected function information (_arrOut)
        IF(_arrDef = "", _arrOut, _arrDef)
      )
    )
    

    The About() function works by accepting a user input as either an index number or function name as text and then returning an output array of information for the chosen function.

    In order to reduce the number of named variables in the function and to keep the approach flexible/dynamic, the output information is stored as long text string with special characters used to indicate the separation by index (“¦“), new line (“|“), and column (“¬“). The strings are concatenated using the & operator to make the overall writing and editing more user friendly and to make the code more readable.

    First (lines 8-10), the function determines whether a value has been supplied for the optional select_function parameter, and if so whether the value is a number, otherwise it is assumed to be text.

    If no input has been supplied, then the general module information string is converted to a readable output array (_arrDef) using the TEXTSPLIT() function (lines 12-26). This default output provides the user information on the module name, module version, etc., as well as the included function names with a brief description of each module and an index number. The output array follows a simple two column structure to make it easier to read, with a title or topic in the first column and the detail in the second column.

    Next, the function creates an array of the function names (_arrNames) using the TEXTSPLIT() function (lines 28-33), which is used to match a passed function name (where the select_function input is a non-number) and determine the correct function index.

    In lines 35-57, the main function help information is split into individual strings with one string per function using the TEXTSPLIT() function (_arrHelp) and based on the separation between functions using the “¦” character.

    Once the _arrHelp array has been created, the required function index is determined using the _num variable (if a number was supplied) or the _idx variable (if a function name was supplied), and attempts to select the required function information string from _arrHelp using a simple INDEX() function call. This selected function information string is converted to an output array (_arrOut) using the TEXTSPLIT() function (lines 60-67), again following the same two column format, where the “¬” character denotes a new column and the “|” character denotes a new line / new row.

    Finally, the function either returns the created output arrays _arrDef or _arrOut depending on whether or not the user supplied an input value for the optional select_function input parameter (line 70) .

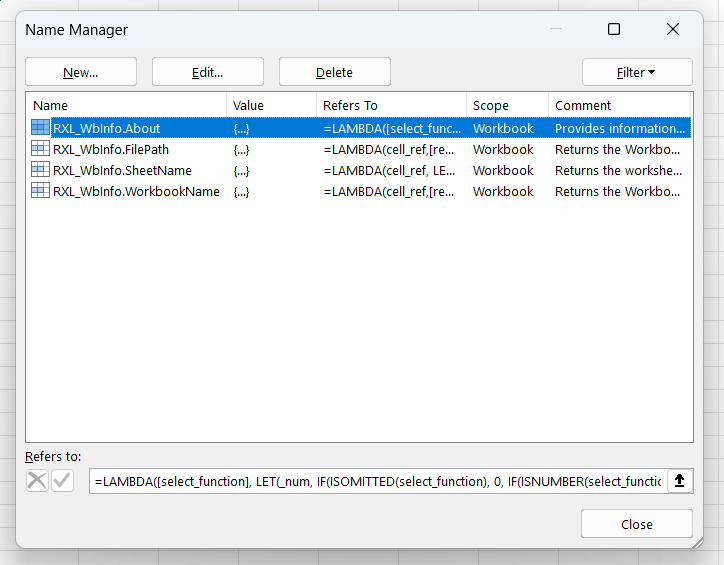
    Workbook Information Module (RXL_WbInfo)

    Below is the final, combined LAMBDA() module which incorporates the About() function, along with the SheetName(), WorkbookName(), and FilePath() functions.

    The functions are shown in outline only, concentrating instead on the format and structure of the comments, documentation, and definitions. (Details on the contents of the module functions can be found above for the About() function and in the Workbook Information Functions (Part 1) post for the other functions).

    /*
        MODULE:     RXL_WbInfo
        AUTHOR:     R Silk, RXL Development
        WEBSITE:    https://excel-bits.net
        GIST URL:   https://gist.github.com/r-silk/9c18090f60ffe442b7d22e6058e83e4a
        VERSION:    1.06 (Apr-2025)
    */
    /*
        Name:        About()
        Version:     1.10 (23-Apr-2025) -- R Silk, RXL Development
        Description: *//**Provides information about the functions in this module*//*
        Parameters:
            + select_function   = (optional) the name or index number of the function that user wants information about
        Error codes:
            #[Error: name not recognised]   = the provided name string does not match those in the module
            #[Error: index not recognised]  = the provided index number does not match those in the module
        Notes:
            - if the select_function input is omitted or an index of 0 is provided then a table of information about the module is returned
            - the user can either provide the index of the chosen function as an integer (1+), or the name of the chosen function as a string
    
    */
    About = LAMBDA(
      
      ...
      
    );
    
    /*
        Name:        SheetName()
        Version:     1.04 (23-Mar-2025) -- R Silk, RXL Development
        Description: *//**Returns the worksheet name (as displayed in the worksheet tab) for the cell reference provided; Workbook must be saved first*//*
        Parameters:
            + cell_ref      = (required) A valid cell reference, e.g. A1, or 'Sheet1'!A1
        Error codes:
            #[Error: cell reference required]   = the cell_ref parameter requires a valid cell reference
            #[Error: Workbook must be saved]    = the Workbook file must be saved first in order for the function to work correctly
            #[Error reading Sheet name]         = an error occurred getting the filename string or extracting the worksheet name from the filename string
        Notes:
            - The function outputs custom error messages as strings; these will not be flagged by Excel or any add-ins as error cells.
            - Alternatively, the custom error messages can be replaced with native Excel error codes so that the error is flagged in the normal way; 
              to do this:
                -- replace the "#[Error: cell reference required]" string with the #VALUE! (or #REF!) error code
                -- replace the "#[Error: Workbook must be saved]" and "#[Error reading Sheet name]" strings with LAMBDA(0) in order to create a #CALC! error code
    */
    SheetName = LAMBDA(
      
      ...
      
    );
    
    /*
        Name:        WorkbookName()
        Version:     1.05 (23-Mar-2025) -- R Silk, RXL Development
        Description: *//**Returns the Workbook name, with or without the file extension, for the cell reference provided; Workbook must be saved first*//*
        Parameters:
            + cell_ref          = (required) A valid cell reference, e.g. A1, or 'Sheet1'!A1
            + remove_extension  = (optional) A TRUE/FALSE or 1/0 value to determine whether to remove the file extension from the workbook filename
        Error codes:
            #[Error: cell reference required]   = the cell_ref parameter requires a valid cell reference
            #[Error: Workbook must be saved]    = the Workbook file must be saved first in order for the function to work correctly
            #[Error reading Workbook name]      = an error occurred getting the filename string or extracting the Workbook name from the filename string
        Notes:
            - The function outputs custom error messages as strings; these will not be flagged by Excel or any add-ins as error cells.
            - Alternatively, the custom error messages can be replaced with native Excel error codes so that the error is flagged in the normal way; 
              to do this:
                -- replace the "#[Error: cell reference required]" string with the #VALUE! (or #REF!) error code
                -- replace the "#[Error: Workbook must be saved]" and "#[Error reading Workbook name]" strings with LAMBDA(0) in order to create a #CALC! error code
    */
    WorkbookName = LAMBDA(
      
      ...
      
    );
    
    /*
        Name:        FilePath()
        Version:     1.04 (23-Mar-2025) -- R Silk, RXL Development
        Description: *//**Returns the Workbook file path, with or without the full file name, for the cell reference provided; Workbook must be saved first*//*
        Parameters:
            + cell_ref          = (required) A valid cell reference, e.g. A1, or 'Sheet1'!A1
            + remove_last_char  = (optional) A TRUE/FALSE or 1/0 value to determine whether to remove the last character in the file path string
            + inc_file_name     = (optional) A TRUE/FALSE or 1/0 value to determine whether to include the full file name with file extension
        Error codes:
            #[Error: cell reference required]   = the cell_ref parameter requires a valid cell reference
            #[Error: invalid optional input]    = either the remove_last_char ot inc_file_name inputs are not a logical (TRUE/FALSE) or numeric value
            #[Error: Workbook must be saved]    = the Workbook file must be saved first in order for the function to work correctly
            #[Error reading File Path]          = an error occurred getting the file name string or extracting the file path from the file name string
            #[Error reading Workbook name]      = an error occurred getting the file name string or extracting the Workbook name from the file name string
        Notes:
            - The function outputs custom error messages as strings; these will not be flagged by Excel or any add-ins as error cells.
            - Alternatively, the custom error messages can be replaced with native Excel error codes so that the error is flagged in the normal way; 
              to do this:
                -- replace the "#[Error: cell reference required]" string with the #VALUE! (or #REF!) error code
                -- replace the "#[Error: invalid optional input]" string with the #VALUE! error code
                -- replace the "#[Error: Workbook must be saved]", "#[Error reading File Path]", and "#[Error reading Sheet name]" strings with LAMBDA(0) in order to create a #CALC! error code
    */
    FilePath = LAMBDA(
      
      ...
      
    );
    

    The above shows my current preferred format for these Excel Labs AFE modules, making use of multi-line comments to provide the module and function documentation. Using comments in this way for the function documentation allows for more extensive and more verbose information but is only accessible via the Excel Labs add-in. Therefore, I also like to add in the About() function to provide more easily accessible function information on the worksheet.

    The initial comment block (lines 1-7) provides the information on the module itself including the suggested module name and version number. I then include the About() function (lines 8-26) followed by the other functions in the order in which I have included them in the About() function information strings.

    Each function is declared and defined in the standard Excel Labs AFE way, starting with the function name and ending with a semi-colon:

    Function_Name = LAMBDA( ... );

    Above each function declaration, I use a multi-line comment block to supply the corresponding function documentation (for example see lines 28-44). This will usually contain:

    • function name;
    • function version;
    • description of the functions action/intended use;
    • input parameters, including information on:
      • whether a parameter is required or optional, and
      • the expected input value(s);
    • potential function output error codes and there meaning; and
    • any additional notes on how the function is intended to work.

    Of note, the description portion of the function documentation is held in its own separate and special comment block. This comment block uses a double asterisk in the format:

    /** [Description text] */

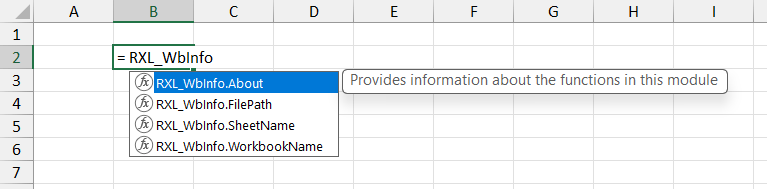
    This is important, as this special comment format indicates to the AFE that this text should be used to populate the Comment property of the defined name that stores the function. As described above the Comment property of the defined function is then displayed to the user when selecting a function to use in their formulae.


    If you wish to use the RXL_WbInfo module (or any other AFE module) in your Excel projects, this can be easily achieved using the below steps:

    1. Ensure that you have the Microsoft Excel Labs add-in installed, and navigate to the Advanced Formula Environment (AFE) tab
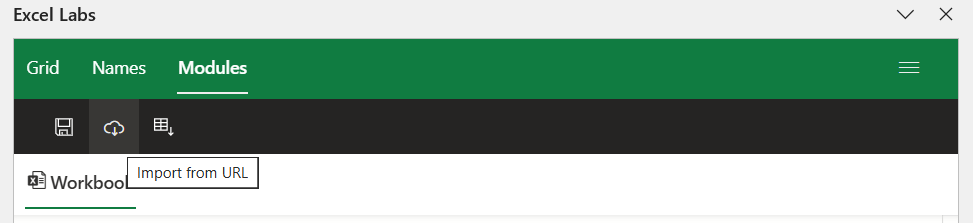
    2. In the AFE choose the Modules section from the green ribbon at the top
    3. Click on the “Import from URL” button in the black ribbon (looks like a cloud with a down arrow)
    1. In the dialogue box that pops up enter the GitHub Gist URL for the RXL_WbInfo module (https://gist.github.com/r-silk/9c18090f60ffe442b7d22e6058e83e4a)
    2. Before clicking the “Import” button, check the box for “Add formulas to a new module?” and add the suggested module name to the text box that appears.

    Once the module has been uploaded, the AFE will save a copy of the full module string complete with code comments in your Excel file, which can then be read via the Excel Labs add-in. The AFE will also save copies of each defined function in the Name Manager as defined names with the specified Comments property, and so you can start using the functions by simply typing =RXL_WbInfo in the formula bar.

  • Workbook Information Functions (Part 1)

    Workbook Information Functions (Part 1)

    In previous financial models and Excel projects I have worked on, the basic template worksheet has often included a formula in cell A1 (or similar) which dynamically returns the worksheet name (as per the text in the worksheet tab) to display as the worksheet title. This means that if the worksheet name is updated, the worksheet title also automatically updates.

    This is achieved using the CELL() function, which can be used to output the worksheet file name in a standardised format:

    C:\Your\File\Path\[File_name.xlsx]Sheet_Name

    The file path is always shown first, followed by the file name with file extension, enclosed within the square brackets (“[ ]”), and finally the worksheet name for the cell reference provided to the CELL() function.

    Excel restricts the use of certain characters in a valid Excel file name and worksheet name, including the “[” and “]” characters. This means that the last “[” and “]” characters in the CELL() file name string can be reliably used to find separate out the worksheet name, file name and file path.

    In a previous post about my development of a TextBetween() function, I showed examples of formulae to extract the file path, file name, and worksheet name from the CELL() function output, particularly using the newer TEXTAFTER() and TEXTBEFORE() functions (see screen shot below). Following this, I thought it might be a fun exercise to build a set of custom functions which a user could use to extract this useful workbook information dynamically and simply.

    The Workbook Information functions module (RXL_WbInfo) is made up of three custom LAMBDA() functions. The rest of this post details how the functions work, and the next post (Workbook Information Functions (Part 2)) will explain how the Excel Labs Advanced Formula Environment (AFE) can be used to create a module of complimentary LAMBDA() functions.

    All of the functions outlined below have been designed to look and feel like native Excel functions, including required and optional parameters as appropriate, as well including input validation checks, error handling, and custom error messages. The code displayed in this post has been made to be more easily read and understood with new lines, additional spacing, indentation, and code commenting.

    The version of the Workbook Information functions included here use custom error messages rather than standard Excel error codes (“# values”). I felt that as these functions are less likely to be used in any crucial calculations and are more likely to be used mainly for dynamic display of Workbook details on information worksheets or worksheet titles, this was a good opportunity to demonstrate using such custom error messages. For further discussion on the topic of error messages in custom LAMBDA() functions please see my previous post.

    A. SheetName()

    The SheetName() function is the simplest of the three functions with a single input parameter required; a valid cell reference.

    = LAMBDA(
      // Parameter definition
      cell_ref,
      // Main function body/calculations
      LET(
        // Check that input provided is as cell reference, otherwise create a custom error message
        _inpChk, IF( NOT(ISREF(cell_ref)), "#[Error: cell reference required]", ""),
        // Get the filename string using the native CELL() function and the cell_ref argument
        _fileName, CELL("filename", cell_ref),
        // Use the TEXTAFTER() function to look for the final "]" character in the filename string
        // If no matching "]" character is found then return an empty string
        _wsName, IF(_fileName <> "", TEXTAFTER( _fileName, "]", -1, , , "#"), "#[Error: Workbook must be saved]"),
        // Check for an error value or empty string and if found return a custom error message, otherwise return the worksheet name string
        _rtn, IF( OR( ISERROR(_wsName), _wsName = "#"), "#[Error reading Sheet name]", _wsName),
        // Final check to see if there was an input error, and if so return the custom error message
        IF(_inpChk <> "", _inpChk, _rtn)
      )
    )
    

    The function uses a LET() function after the parameter declarations (line 5), to enable staged calculations and additional temporary variables within the main LAMBDA() calculation.

    The first part of the calculations is an input validation check (lines 6-7), which ensures that the cell_ref input provided is a valid cell reference.

    Next the CELL() function is used to get the full file name string output in the _fileName variable (lines 8-9). Then, the TEXTAFTER() function is used to get text after the last “]” character (instance number -1), which based on the expected CELL() function output, will represent the worksheet name for the cell reference provided (lines 10-12).

    If the _fileName variable is a blank string then this suggests that the Workbook for the cell reference provided is not saved, and so we return an appropriate error message.

    The result of the TEXTAFTER() function call (as per the _wsName variable) is checked, and if an error has occurred then an appropriate error message is provided as the _rtn variable otherwise the extracted worksheet name is used (lines 13-14).

    Finally, the function uses an IF() statement to check whether the input validation check has flagged (lines 15-16) in which case the created error message is returned; if not the _rtn variable is returned, having already undergone error handling during the calculation of the _rtn variable value.

    B. WorkbookName()

    As with the SheetName() function, the WorkbookName() function requires a single valid cell reference as the main input parameter (cell_ref) but also includes the remove_extension optional parameter to add additional functionality.

    • If the input is TRUE the file name without file type extension is returned (equivalent to the Workbook name), otherwise the full file name including the file type extension is returned.
    = LAMBDA(
      // Parameter definitions
      cell_ref,
      [remove_extension],
      // Main function body/calculations
      LET(
        // Update the optional input to a default of False if omitted or a non-Boolean/non-numeric value is supplied
        _extChk, AND( NOT(ISLOGICAL(remove_extension)), NOT(ISNUMBER(remove_extension))),
        _fileExt, IF( 
          OR( ISOMITTED(remove_extension), _extChk), 
          FALSE,
          remove_extension
        ),
        // Check that the cell_ref input supplied is a valid cell reference
        _inpChk, IF( 
          NOT(ISREF(cell_ref)), 
          "#[Error: cell reference required]", 
          ""
        ),
        // Get the filename string using the native CELL() function and the cell_ref argument
        _fileName, CELL("filename", cell_ref),
        // Use a combination of the TEXTAFTER() and TEXTBEFORE() functions to get the workbook name from the filename string
        _strName, TEXTBEFORE( TEXTAFTER(_fileName, "[", -1, , , "#"), "]", -1, , , "#"),
        // Remove the file extension from the workbook name string as required
        _wbName, IF(
          _fileExt, 
          TEXTBEFORE(_strName, ".", -1, , , _strName), 
          _strName
        ),
        // Determine whether to return an error message or the workbook name string
        _rtn, IFS(
          _fileName = "", "#[Error: Workbook must be saved]",
          OR( ISERROR(_wbName), _wbName = "#"), "#[Error reading Workbook name]", 
          TRUE, _wbName
        ),
        // Finally determine whether to return an input error message or the return string
        IF(_inpChk <> "", _inpChk, _rtn)
      )
    )
    

    The function uses a LET() function after the parameter declarations (line 6), to enable staged calculations and additional temporary variables within the main LAMBDA() calculation.

    First, the function deals with the optional remove_extension input parameter (lines 7-13) and sets a default value of FALSE if no input value is provided by the user or an invalid input value is provided.

    Next, the function performs input validation checks (lines 14-19) via the _inpChk variable, which check that the cell_ref input provided is a valid cell reference as required by the CELL() function.

    The function uses the CELL() function to get the full file name output for the referenced cell (_fileName variable; lines 20-21), and then a combination of nested TEXTAFTER() and TEXTBEFORE() functions to extract the referenced Workbook file name (_strName variable; lines 22-23). As previously described, the last “[” and “]” characters (delimiter instance -1) are used as for this step as these are invalid characters for the Excel file name and Worksheet name and so will only be seen encompassing the Workbook file name in the expected CELL() function output.

    If the user has chosen to use the remove_extension optional parameter, the _wbName variable will either the return the full text of the _strName variable (including the file extension) or use the TEXTBEFORE() function to return the text up to the last “.” character in the _strName text (lines 24-29).

    The _rtn variable calculations provide error handling for the main calculations (lines 30-35). If the _fileName variable from the CELL() function output is a blank string this suggests that the referenced Workbook is not saved and so an appropriate error message is provided. If either the “[” or “]” characters were not found as expected in the previous steps, then an appropriate, more general error message is provided.

    The final step in the calculations (lines 36-37) checks whether an input check was flagged and returns the created error message, otherwise the error handled _rtn variable value is returned.

    C. FilePath()

    The FilePath() function is the most complex and flexible of the three functions. It again requires a valid cell reference for the main cell_ref input parameter, and provides two optional parameters:

    • remove_las_char = if the input is TRUE, then the full file path is returned without the trailing “\” or “/” character
    • inc_file_name = if the input is TRUE, then the full file path is returned along with the file name including the file type extension
    = LAMBDA(
      // Parameter definitions
      cell_ref,
      [remove_last_char],
      [inc_file_name],
      // Main function body/calculations
      LET(
        // Input checks
        _chrChk, AND( NOT(ISOMITTED(remove_last_char)), NOT(ISLOGICAL(remove_last_char)), NOT(ISNUMBER(remove_last_char))),
        _fnmChk, AND( NOT(ISOMITTED(inc_file_name)), NOT(ISLOGICAL(inc_file_name)), NOT(ISNUMBER(inc_file_name))),
        _refChk, NOT(ISREF(cell_ref)),
        // Dealing with optional parameters, setting default values if omitted
        _lastChr, IF(
          OR( ISOMITTED(remove_last_char), _chrChk),
          FALSE,
          remove_last_char
        ),
        _incFile, IF(
          OR( ISOMITTED(inc_file_name), _fnmChk),
          FALSE,
          inc_file_name
        ),
        // Get the full file path and name
        _full, CELL("filename", cell_ref),
        // Extract the file path only
        _path, TEXTBEFORE(_full, "[", -1, , , "#"),
        _filePath, IF(_lastChr,
          LEFT(_path, LEN(_path) - 1),
          _path
        ),
        // Extract the Workbook name element inc. file extension
        _wbName, TEXTBEFORE( TEXTAFTER(_full, "[", -1, , , "#"), "]", -1, , , "#"),
        // Check for input errors and calculation errors, and set the appropriate error message
        // Note - errors placed in order of importance/reporting as only a single message is returned for multiple errors
        _errChk, IFS(
          _refChk, "#[Error: cell reference required]",
          _full = "", "#[Error: Workbook must be saved]",
          OR(_chrChk, _fnmChk), "#[Error: invalid optional input]",
          OR( ISERROR(_filePath), _filePath = "#"), "#[Error reading File Path]",
          AND( OR( ISERROR(_wbName), _wbName = "#"), _incFile), "#[Error reading Workbook Name]",
          TRUE, ""
        ),
        // Construct the required output string
        _rtn, IF(_incFile,
          _path & _wbName,
          _filePath
        ),
        // Final check - if an error message is present return that, otherwise return the constructed output string
        IF(_errChk <> "", _errChk, _rtn)
      )
    )
    

    The function uses a LET() function after the parameter declarations (line 7), to enable staged calculations and additional temporary variables within the main LAMBDA() calculation.

    First, the function performs input validation checks (lines 8-11) to ensure that any inputs provided are valid. After this the function deals with the optional parameters remove_last_char and inc_file_name, and assigns default values of FALSE if either is omitted by the user (lines 12-22).

    Next, the function uses the CELL() function to get the full file path for the referenced cell (lines 23-26), and then uses the TEXTBEFORE() function to extract the text before the last instance of the “[” character (delimiter instance number -1). Based on the expected output format of the CELL() function, the final character before the last instance of the “[” character will either be a “\” or “/” character, depending on the referenced file location. As there may be circumstances where the user wants to provide the file path as the folder description only, there is the option to remove this trailing character using the remove_last_char parameter (lines 27-30).

    The Workbook name is also extracted from the CELL() function output (_fileName) and stored as the _wbName variable (lines 31-32).

    Next, error handling is performed to check if any of the input validation checks have failed or if an error has occurred during the preceding main calculations (lines 33-42). This is achieved using an IFS() statement, where the more important errors will trigger first and so the single custom error message will be provided in a hierarchical manner – i.e. invalid inputs come before calculation errors in the reporting to the user for debugging purposes.

    After this the required output string is constructed and stored in the _rtn variable (lines 43-47). If the user has chosen to use the inc_file_name optional parameter, then the full file path (including trailing character) is provided (_path variable) with the full file name and file type extension (_wbName variable); otherwise, the adjusted file path string is used (_filePath variable).

    Lastly, an IF() statement is used to check if an appropriate error message was returned from lines 35-42 (_errChk variable), and if so this is returned to the user as the function output; otherwise the calculated string in the _rtn variable is returned (lines 48-49).


    If you want to see further information on the development and documentation of the above three functions then I have provided an Excel file (RXL_WbInfo.xlsx) which you can download and explore at the following GitHub repository:

    https://github.com/r-silk/RXL_Lambdas

    The file contains a page on each of the function with the final versions of the functions as seen above as well as version of the functions which do not use the newer TEXTBEFORE() and TEXTAFTER() functions and instead demonstrate how the same functionality can be achieved with older Excel functions and approaches. There is also a “Demo” worksheet which demonstrates the outputs from each function using the main input parameter combinations.

    The file contains a copy of each function in the Defined Names manager which can be copied into your own file, or alternatively there is a “minimised” version of each function which can be copied and pasted directly into the Name Manager when defining a new name in your own files — please use the suggested function names when using this method:

    • RXL_SheetName()
    • RXL_WorkbookName()
    • RXL_FilePath()

    Finally, there Gist URLs for each of the functions, however, I would encourage you to read the next post (Workbook Information Functions (Part 2)) and use the Gist URL for the RXL_WbInfo module instead if you are intending on adding these functions to an Excel file via the Excel Labs Advanced Formula Environment (AFE).

  • LAMBDA() functions

    LAMBDA() functions

    When I first came across the LAMBDA() function in Excel I was a little underwhelmed. Don’t get me wrong, Excel Lambda functions are great but my experience of them at this time was limited.

    When I started using the LAMBDA() function, my only experience was using it within dynamic array helper functions like BYROW(), BYCOL(), SCAN(), etc.

    At the time I was working on developing a financial model based solely on dynamic array calculations and functions. Through this I really saw the utility of functions like BYCOL(), SCAN() and REDUCE() and had got very used writing short LAMBDA() functions as part of these dynamic array helper functions (this was before the joys of eta reduced lambdas). During this time I learnt about being able to define LAMBDA() functions as defined names and thereby re-use a function, which after writing the same short LAMBDA() functions over and over again seemed like an absolutely brilliant idea!

    The inspiration

    The moment that I came to truly love LAMBDA() functions was when I came across a talk by the mighty Craig Hatmaker, where he discussed his own Lambda functions and his 5G concept for financial model builds. He demonstrated creating modules of brilliant Lambda functions complete with code commenting and some in built documentation using the Excel Labs Advanced Formula Environment (AFE). In particular I liked his approach of using a standardised function structure and the use of the LET() function within the Lambdas.

    These Lambda modules by Craig Hatmaker are what inspired me to start building my own Lambda functions and modules in a structured and standardised way, to try and make my functions as professional, flexible and robust as possible.

    My approach

    Below is an outline of my preferred approach to building LAMBDA() functions which can be easily re-used and shared with others, and hopefully more closely mirror the native Excel functions both in style and behaviour to make them more user friendly.

    = LAMBDA(
      // Define the function parameters
      parameter_one,
      [parameter_two],
      // The main function code is enclosed within a LET() function
      LET(
        // Start by dealing with optional parameters
        _paraTwo, IF( ISOMITTED(parameter_two), "", parameter_two),
        // Input checks
        _paraOne, parameter_one,
        _inpChk, IF( OR( ISNUMBER(_paraOne), ISNUMBER(_paraTwo)), #VALUE!, ""),
        // Perform the main function calculations
        _valOne, IF( 
          ISLOGICAL(_paraOne),
          IF(_paraOne, "Hello World!", "Goodnight New York!"),
          _paraOne
        ),
        // Finish the main function calculations with a variable called _rtn
        _rtn, IF(_paraTwo = "", _valOne, _paraTwo),
        // Check if the input checks have flagged an error
        // -> if there was an input error return that otherwise return the calculated output
        IF(_inpChk <> "", _inpChk, _rtn)
      )
    )
    

    The first thing to note is the use of space, indentation, and new lines. In my opinion this makes the code much easier to read and follow, allowing you to break-out and show some of the structure and logic of your calculations.

    Where possible I use code comments to help any user understand what each section of the function is doing, but this can only be included in a documentation/display version of the Lambda or in an Advanced Formula Environment (AFE) version and has to be removed beforing defining the function in the Name Manager if you are not using AFE.

    I always use a LET() function after the parameter definitions to enclose the main function calculations and output. This allows for breaking more complex operations to be broken into smaller chunks and allows for temporary variables to be used within the function.

    1. Function parameters

    When defining parameter names for the function I like to follow a similar style to the parameter names seen in the native Excel functions. I try to use longer more descriptive names in lower case with spaces replaced by underscores. This makes it easier for the user to understand what inputs are expected for each parameter and is more user friendly as it mimics a style the user expects. Parameters are either defined as required or as optional (achieved by placing enclosing the parameter name in square brackets).

    Having defined my parameters with longer, more descriptive names, I usually shorten them by re-defining new variables within the LET() function. As a naming convention, I always start these variables with an underscore so that I know it is a variable I have defined/created, and then use standard Camel case usually with an abbreviated version of the original function parameter name.

    It is possible to for all function parameters to be optional, which allows the user to call your Lambda without sending any inputs to it. In Craig Hatmaker’s 5G approach this is used as an opportunity to return some function help documentation to the user as a string array (an inspired idea).

    My personal preference is to keep any important inputs as required parameters, similar to the native Excel functions, and then provide a separate About() function in any modules to give the user on-the-fly help and documentation.

    2. Optional parameters

    Having defined the function parameters and opened the main LET() function, I start by dealing with any optional function parameters I may have offered the user.

    Here the ISOMITTED() function is key. With the simple line:

    IF( ISOMITTED({optional_parameter}), {default_value}, {original_value})

    you can easily set a default value for your optional parameter thereby not needing to adjust your main calculations to deal with optional function parameters.

    I tend to do this first so that the following input checks will only flag a problem with a value for optional parameter that the user has provided rather than my default/fall-back value (hopefully I have been sensible enough to use a default value which won’t break my main code or lead to my input checks flagging!)

    3. Input checks

    Having dealt with default values for optional parameters I try to handle potential errors that could occur due to incorrect or unexpected inputs provided by the user.

    An erroneous input argument can have an unpredictable impact on the results of your functions main calculations so it is best to try and identify them early and then warn the user. The output from input checks could be a single Excel error code (# value), a single custom error message (string), or even an array of error codes of messages.

    My preference is to output a single error code or message to the user, with the most important input error taking preference, as this is the behaviour seen with native Excel functions. The advantage of this approach is that you highlight a single, important error for the user to deal with in a focussed manner; the disadvantage being that as the user fixes one issue, a new, less vital error is uncovered, which can be frustrating for a user.

    Whichever approach you choose, it is better to handle an input error early and deal with it in a controlled way where you choose the error code/message, rather than checking for an error at the end of the main function calculations and trying to guess as to the cause or simply allowing the Excel evaluated error code to be returned.

    4. Main calculations

    For the main function calculations, I like to take full advantage of the LET() function and split the calculations into logical blocks or components.

    This method is helpful during development as you can output and test the result at each intermediate stage of the calculations by having the LET() function return the intermediate variable. It is also helps in user understanding and maintainability of the code by avoiding large, complex, nested calculation blocks.

    This point in the function structure is also a great time to use indentation and spacing in the function code to highlight the calculation blocks, the calculation logic, and any hierarchy in nesting as appropriate.

    5. Calculation output

    I finish each of my function calculations with a final _rtn variable. This indicates that this is the intended output (or return) of the main function calculations and signals the end of the main calculations. By following this standard approach it easy to quickly find the output of the function and then work back as needed to see how it is calculated.

    It also helps to define the intended output as a variable during development as this makes it easy to change the actual output of your LET() and thereby LAMBDA() function to a different variable within the LET() to do some sense checking and debugging, then finally set the output back to the _rtn variable when finished.

    6. Function output

    The true utility of setting the intended function output to be the _rtn variable is that I can then use a final step in my output to control what is returned to the user — my last argument of the LET() function uses an IF() statement to decide whether to return an input check flag or the calculated output to the user.

    This is helpful as it allows me to control any error messages more easily and avoid unexpected behaviour in the calculations. It is possible to provide an unexpected input to a function parameter and have the calculations evaluate to an answer which the user sees rather than error. It also allows you as the developer to decide what error message the user gets for an incorrect input rather than whichever Excel error code is produced.

    By performing input checks at the start of the function and then flagging this at the end of the function, you can even produce custom error messages as strings which the user will see as the output. In my opinion there are pros and cons to using custom error messages which I will talk about in a future post.

    You can also extend this approach and have your final LET() argument check for errors flagged in your calculations and return a custom error code or error message to the user, but personally I normally limit myself to handling input error explicitly.

    Conclusion

    Hopefully the above makes sense and gives you some ideas of how to standardise an approach to writing and developing Lambda functions. I look forward to continuing to tweak my approach and developing my own best practices over time but I feel like this is good place to start.